When I posted my office reveal (HERE) last fall, one of the most common questions that came in was “how do you hide computer cords?” First, I will say this. When I was coming up with the schematic of this room, desk placement and cords were my number one consideration. It’s a major reason why a lot of people keep their desk against the wall. But, knowing built-ins were a “must have” for me and envisioning a desk in the center of the room, I was determined to come up with a solution. I talked with my shelving carpenter at length about the best solution. Add an outlet in the floor? I didn’t want to commit to that, especially if this room isn’t an office one day. Add an outlet beneath the file drawers and run the cords backwards? I didn’t want to roll over them. Ultimately, we talked it out and decided that we wouldn’t have to make any sophisticated electrical adjustments. So, how do you hide computer cords when your desk is in the center of the room?
*post contains affiliate links | full source list at the bottom of this post*
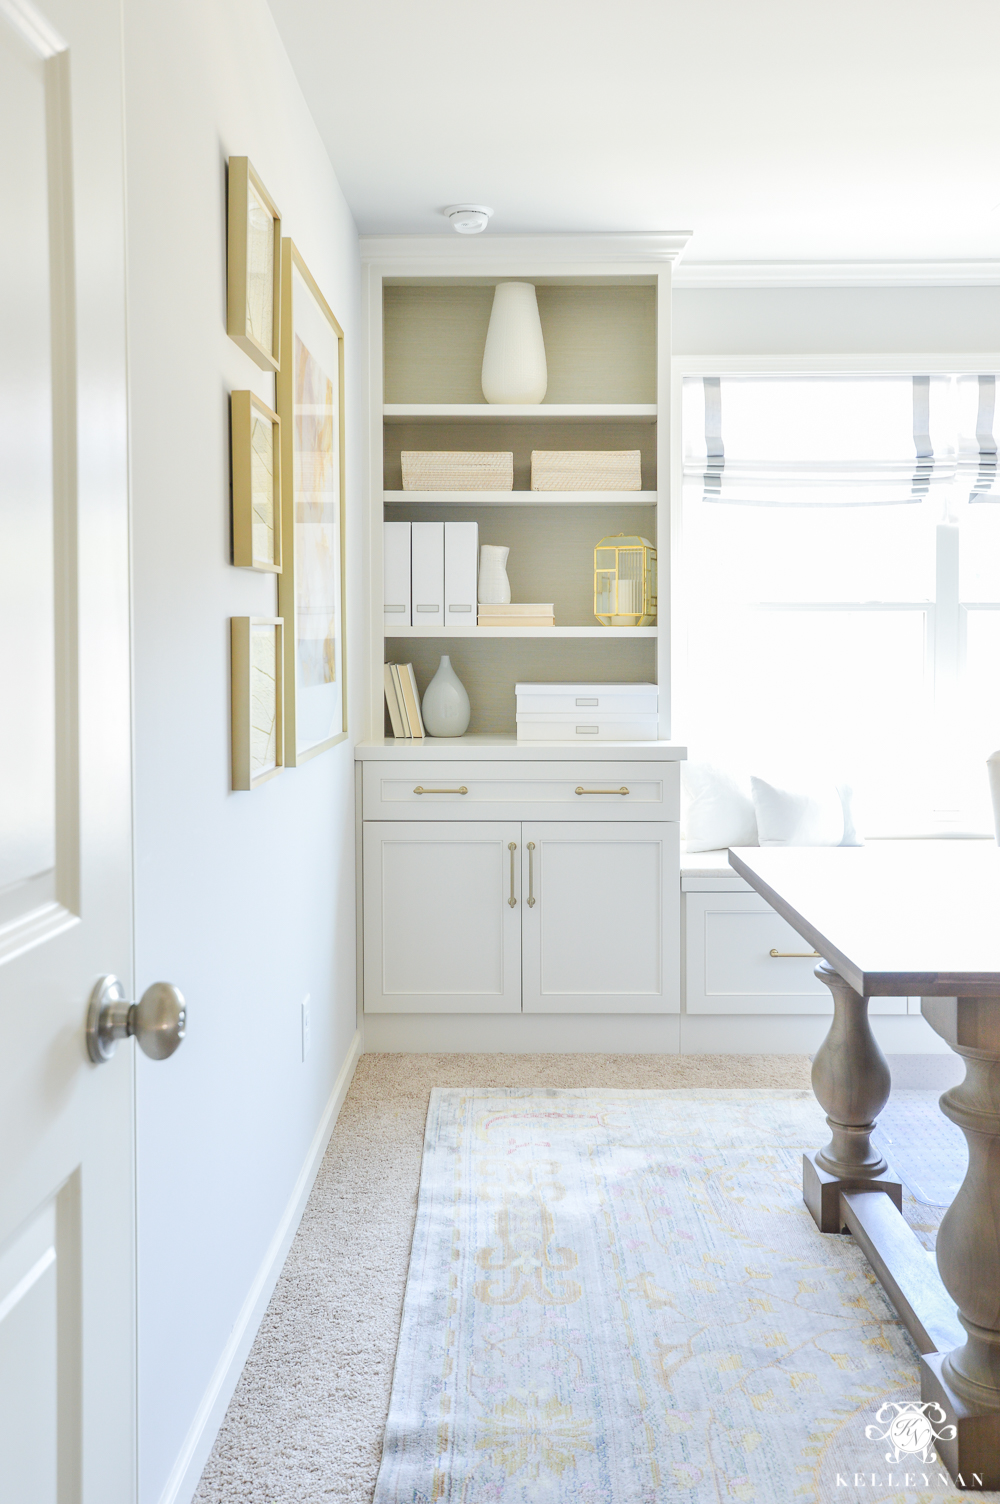
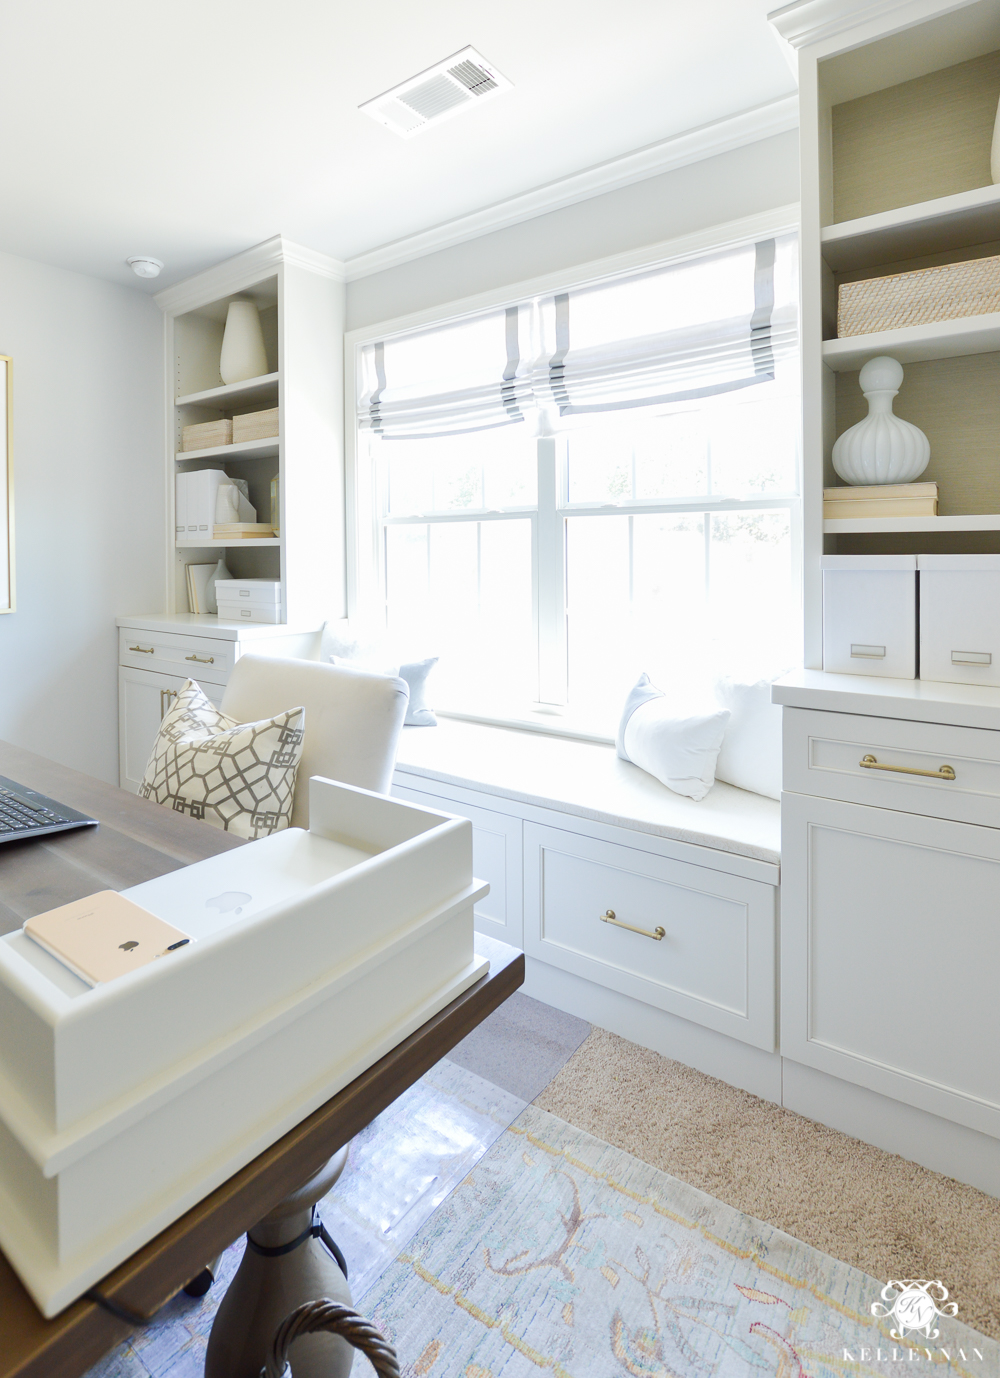
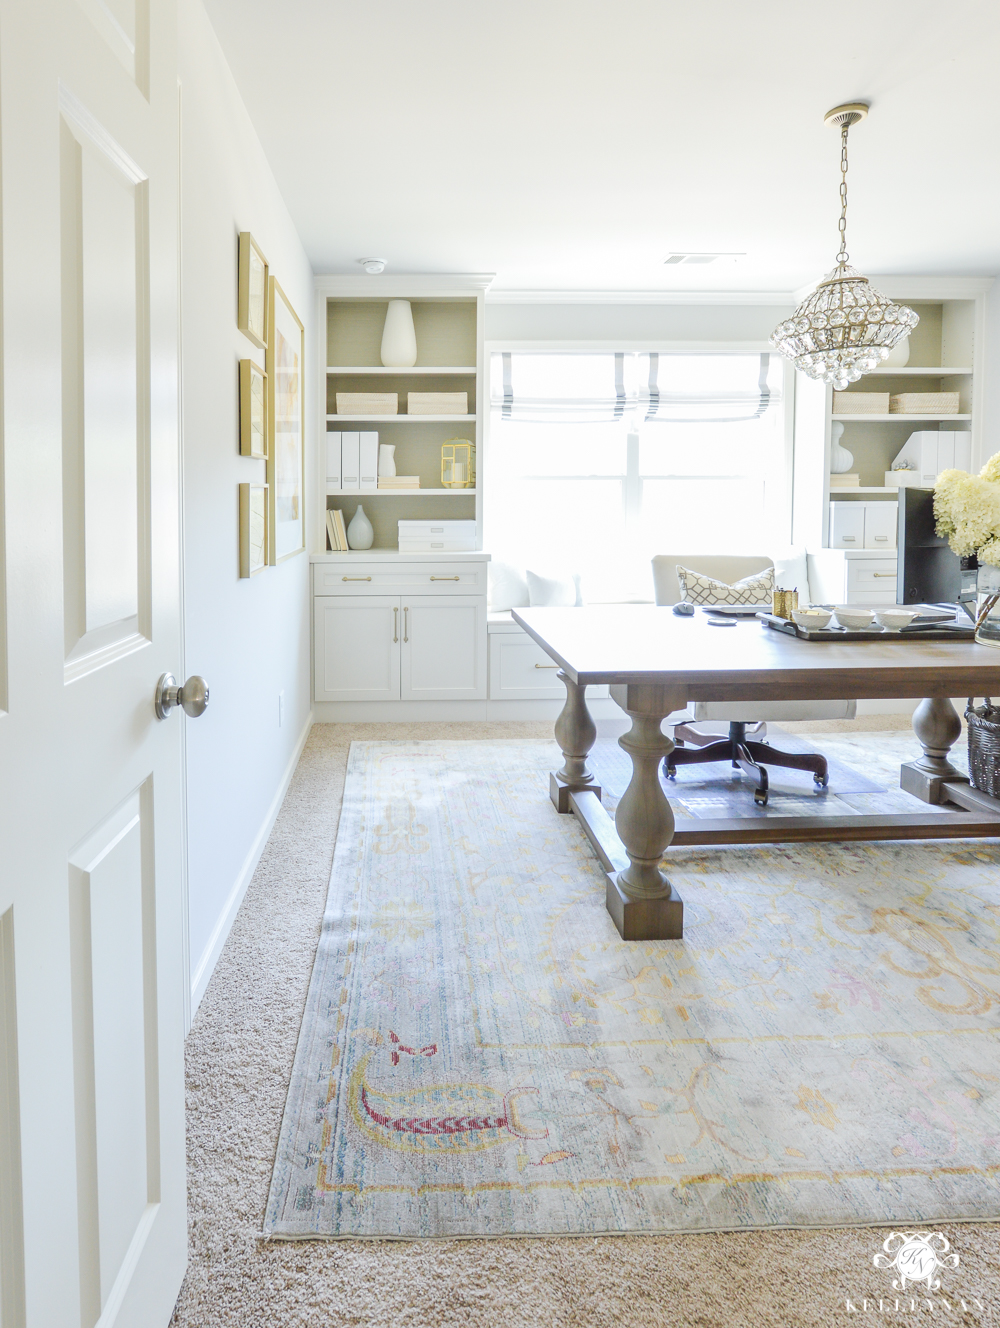
Sources: Rug | Large Wall Art | Small Wall Art | Roman Shade | Rattan Bin | Magazine Holder | Document Holder | Gray Vase | Cabinet Pull
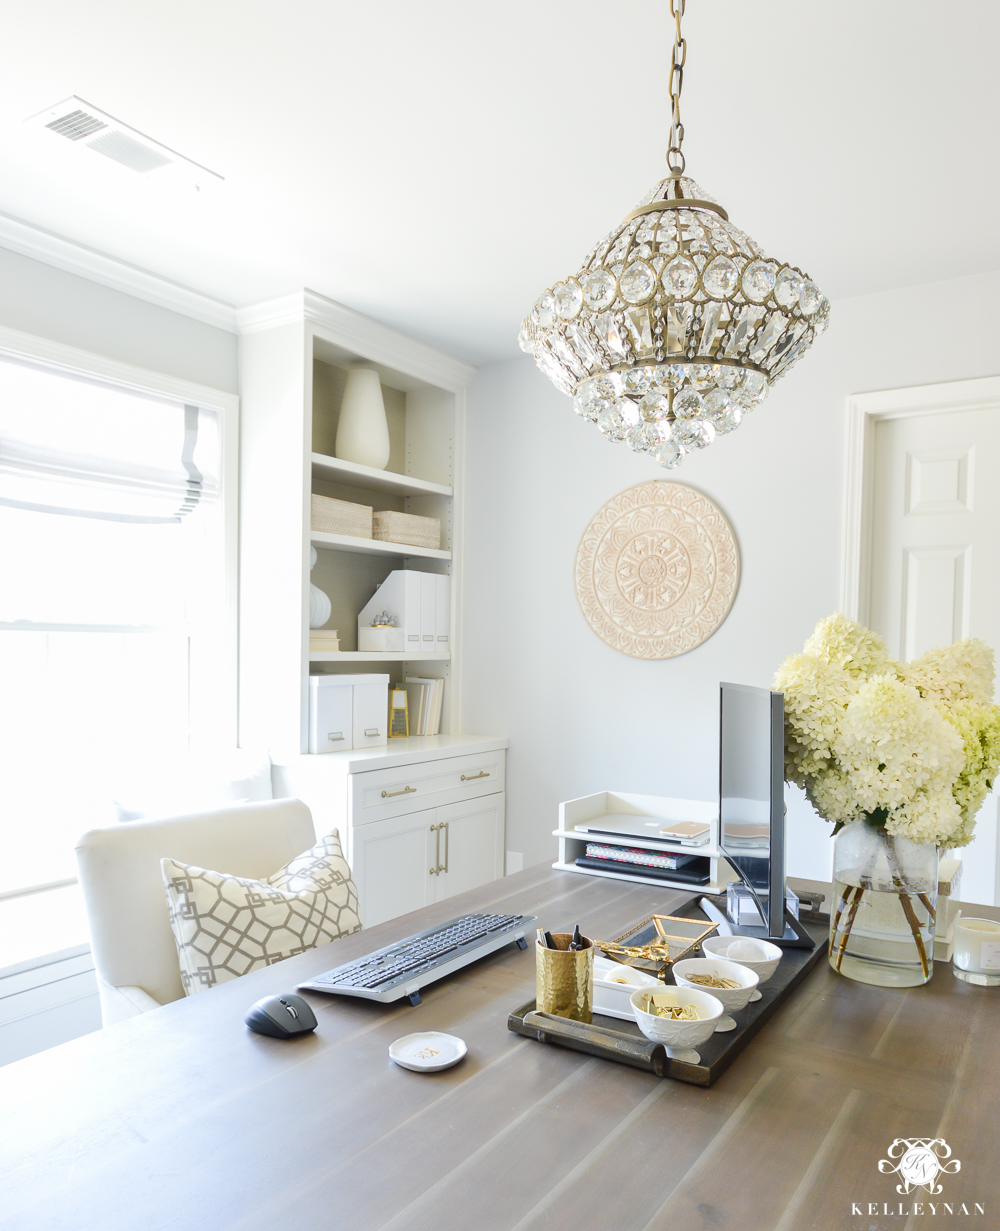
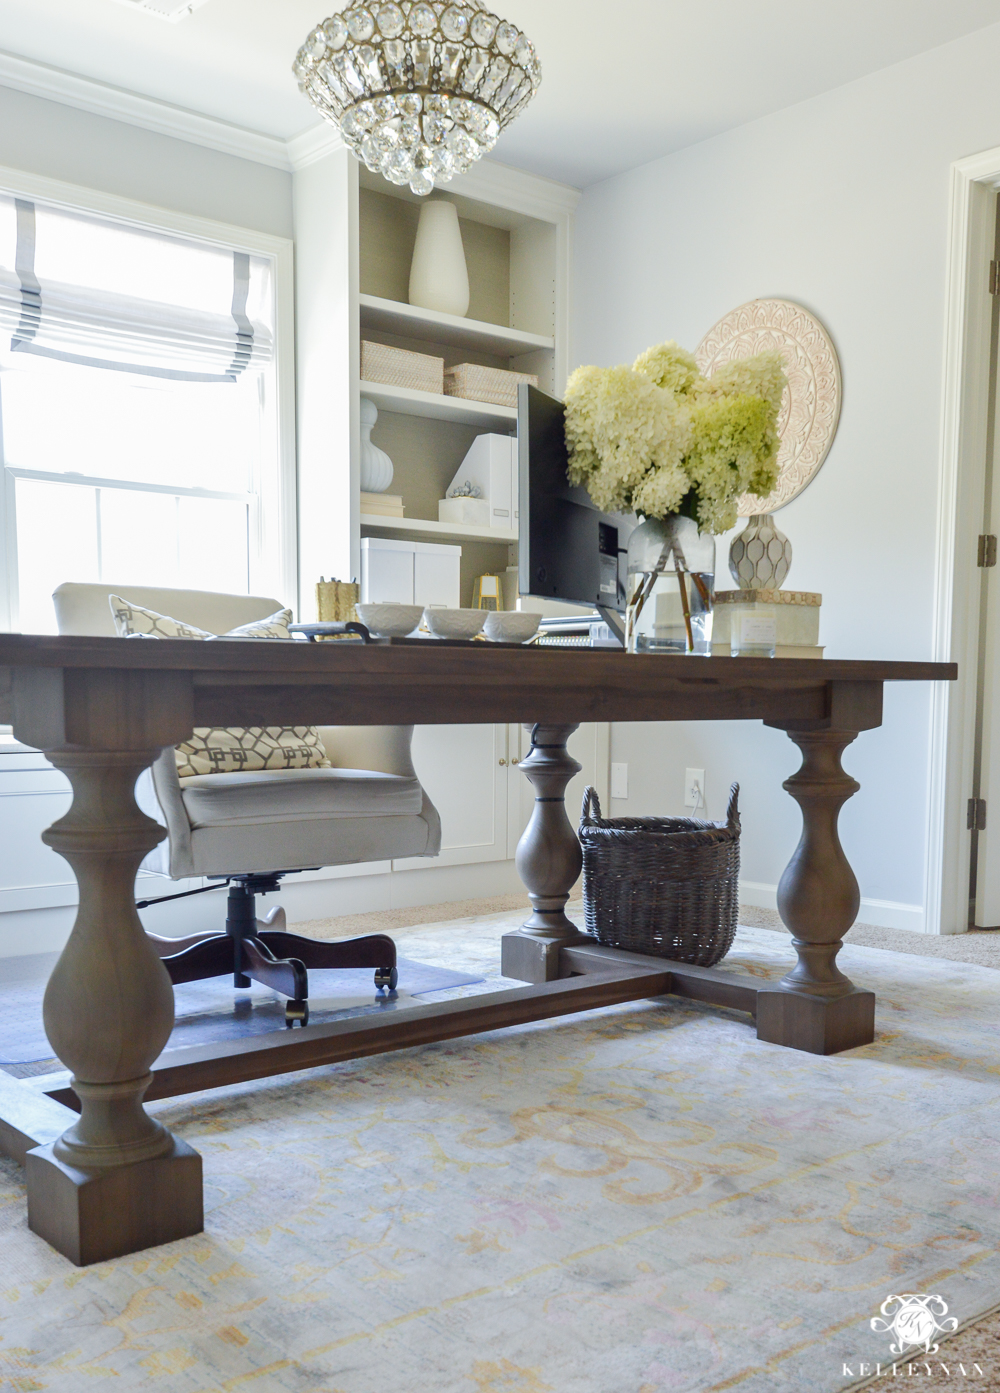
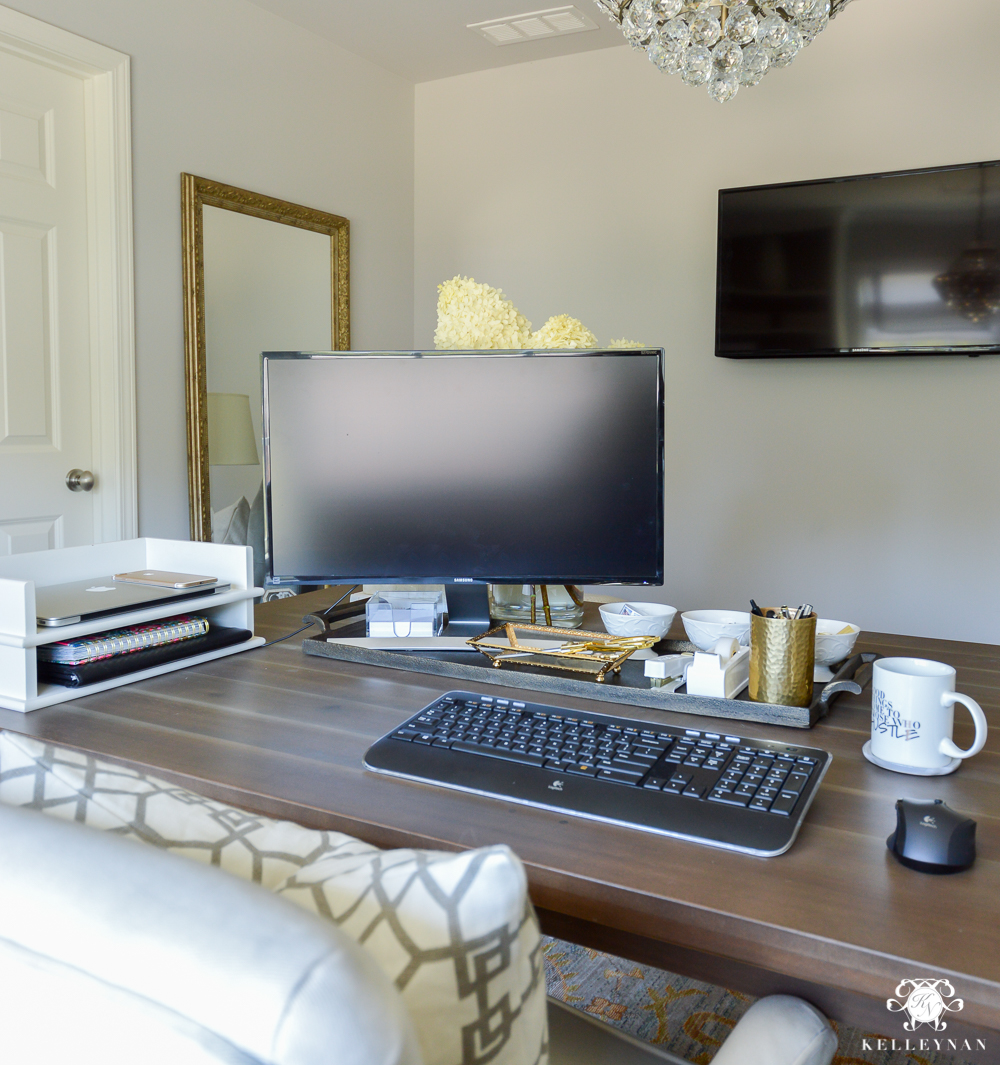
Another important point I should emphasize before I get into the “how” is the “why”. My home office is used as a full working office. It isn’t just a place to pay bills and set a cute laptop (I wish!). My previous job required a lot of unwieldy equipment and files, which was the primary reason for deciding on the built-in installation. But my desk especially had to accompany a huge computer, along with my laptop. (This is why I decided on an actual table in lieu of a desk – to provide ample surface space.) When I made the switch a few weeks ago, a lot of my office equipment was minimized but I still prefer a large screen over my 13″ Macbook, a keyboard, and a mouse. We already had a spare curved screen for outdoor movie nights so Dave set me up with that, a keyboard and mouse, and an adapter cable. Now, all I have to do is plug my Macbook in and set to work on the large screen. Here’s what my desk is looking like these days, with my new efficient setup.
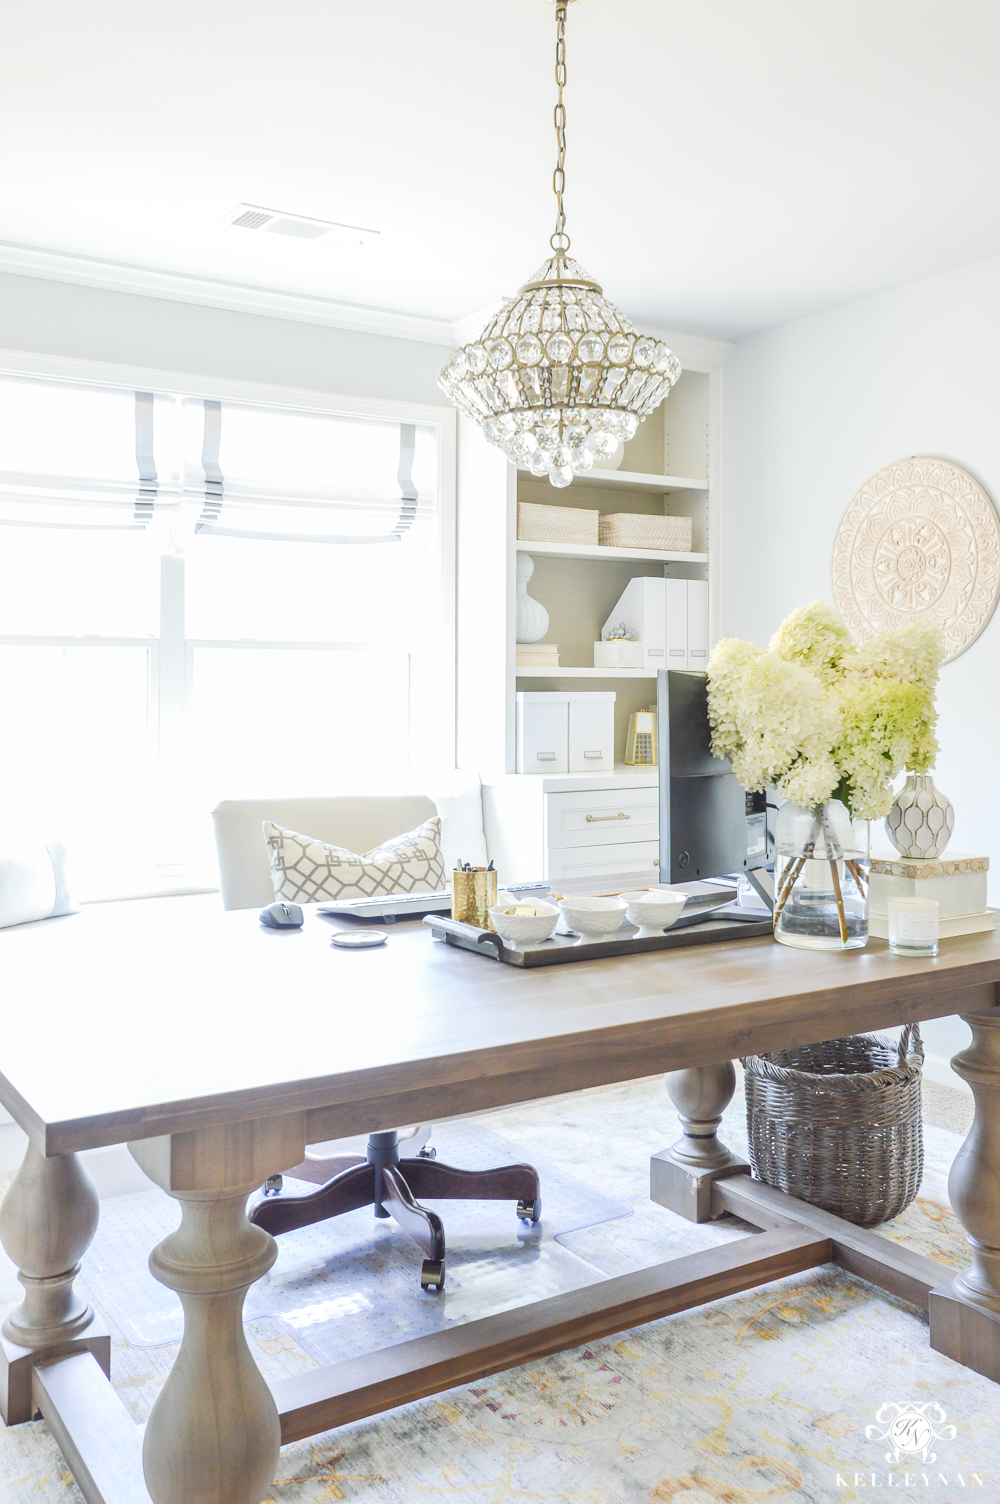
Sources: Chandelier | Pillow | Desk Tray | Footed Bowls | File Holder | Magazine Holder | Rattan Bins
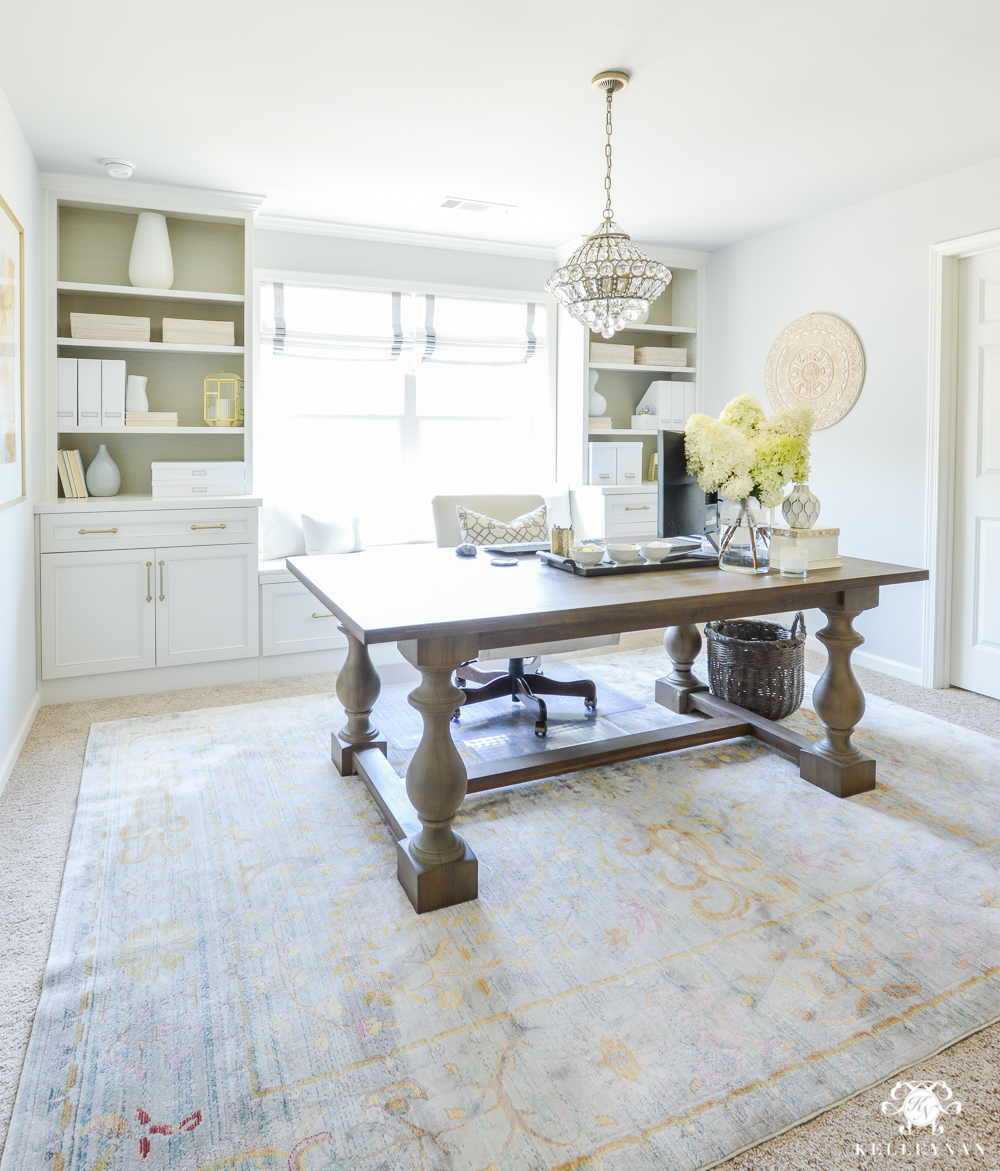
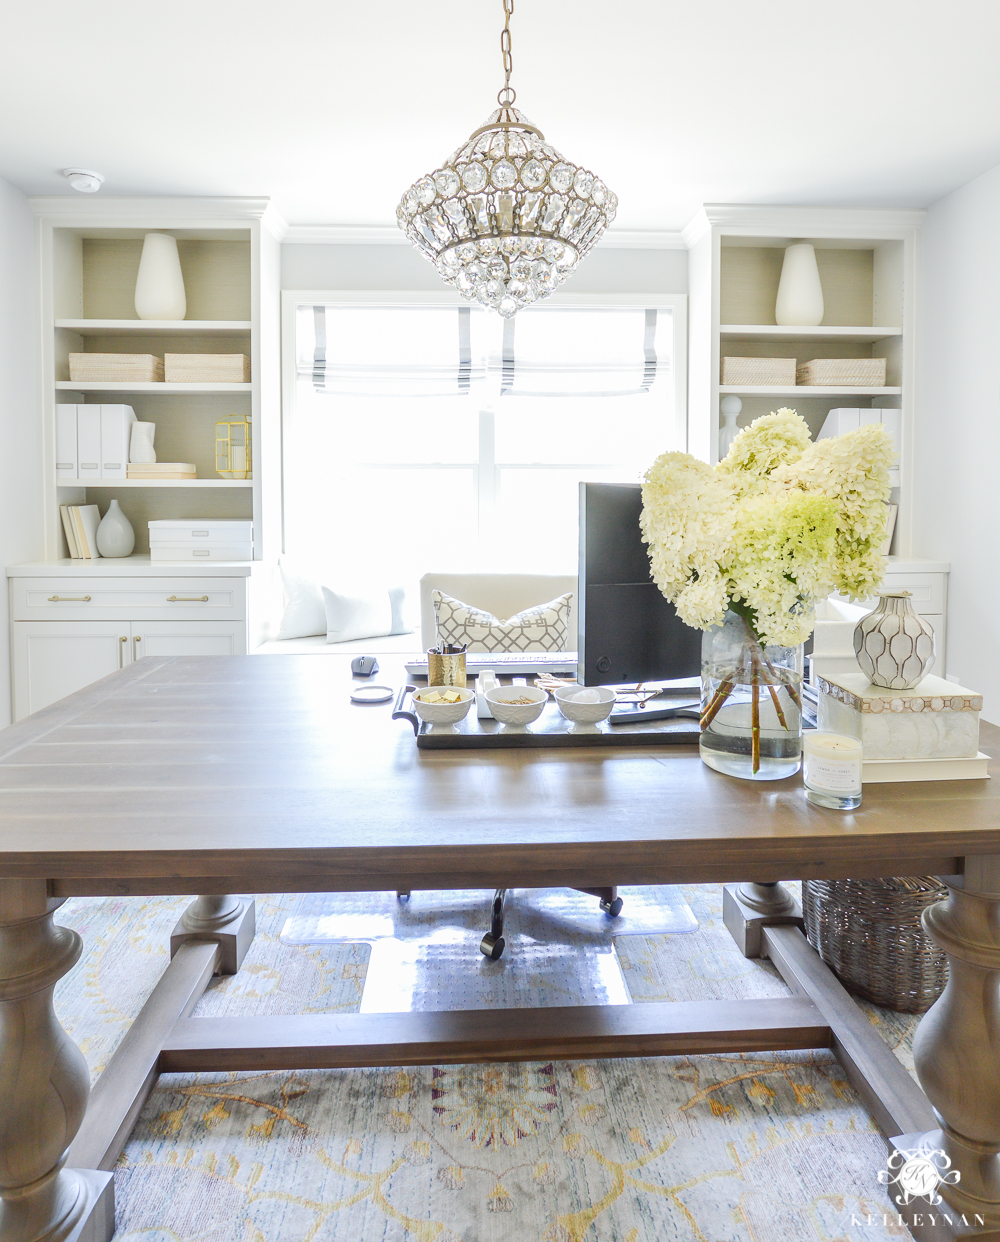
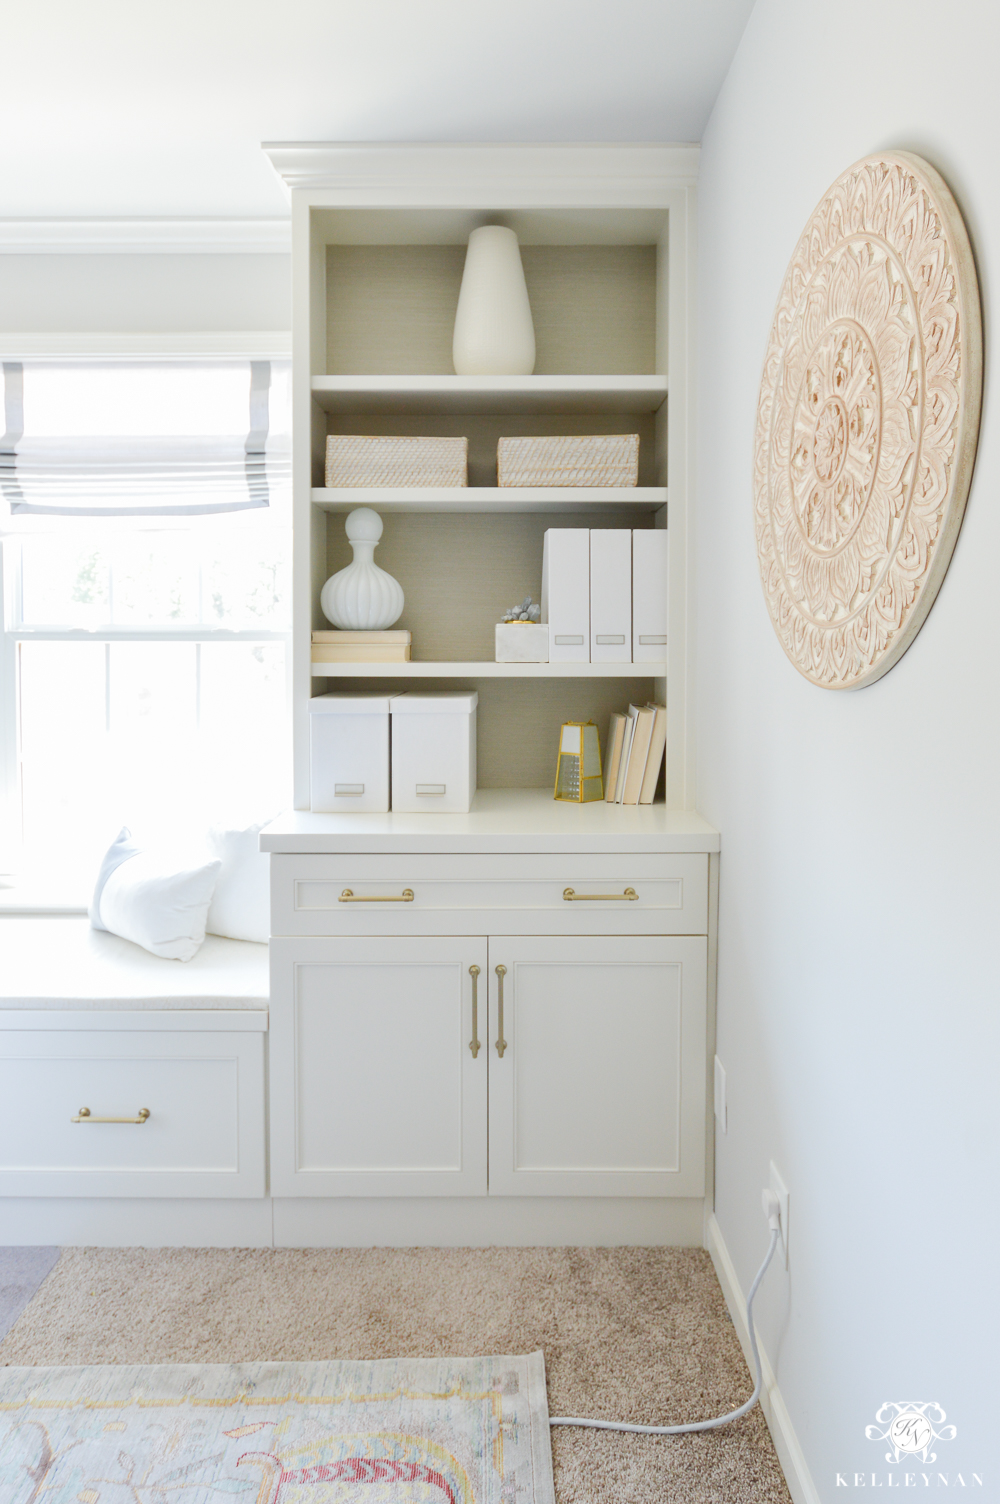
We’ll get to more on that in a bit, after we go over the cord management solution. Below is a view of my office and desk from the door. Do you see any visible cords? I will say, I am not above photoshopping outlets or cords on occasion but for authenticity sake, I did not doctor the photos in this post so you can get an honest, realistic visual of the actual setup.
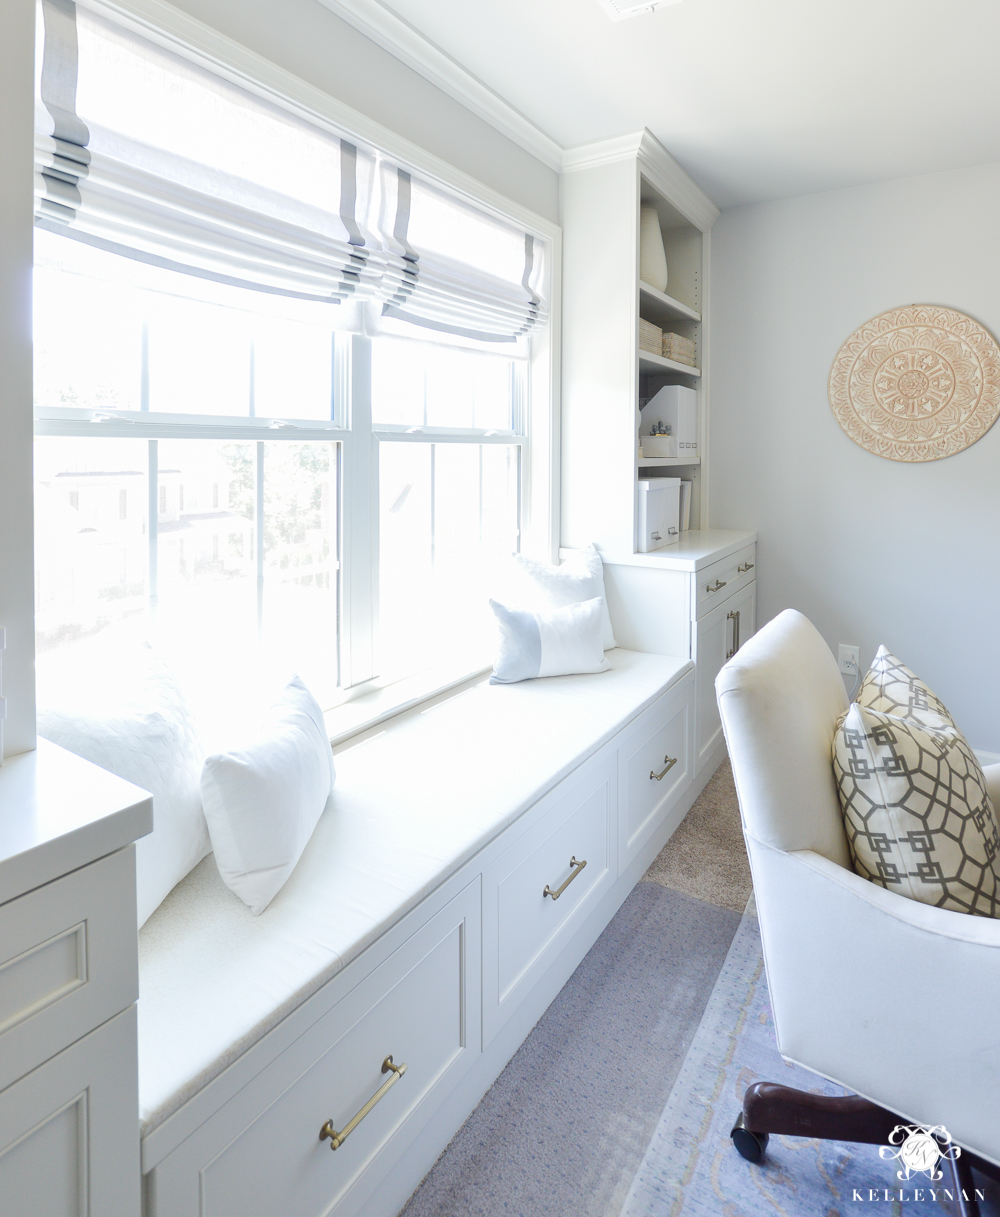
No cords back here either to get hung up on 😉 If your office is carpeted, I would go for a clear mat for your rolling desk chair. It is especially helpful if you are using a rug underneath your desk; you don’t get caught on the side of the rug. Just make sure you choose one with teeth, not a slick bottom (HERE).
Here are the considerations and steps you can take, in order, to hide computer cords when your desk is in the center of the room.
1. IDENTIFY WHICH OUTLET(S) YOU WILL USE
Ultimately, I decided on a wall outlet to the side of my desk – the side furthest from the door. I had to determine the closest path to get my electronic components (in this case, monitor) to the outlet in the “sneakiest”, easiest way. Which leads me to…
2. WHERE YOU POSITION YOUR ELECTRONIC COMPONENT(S) ON YOUR DESK MATTERS
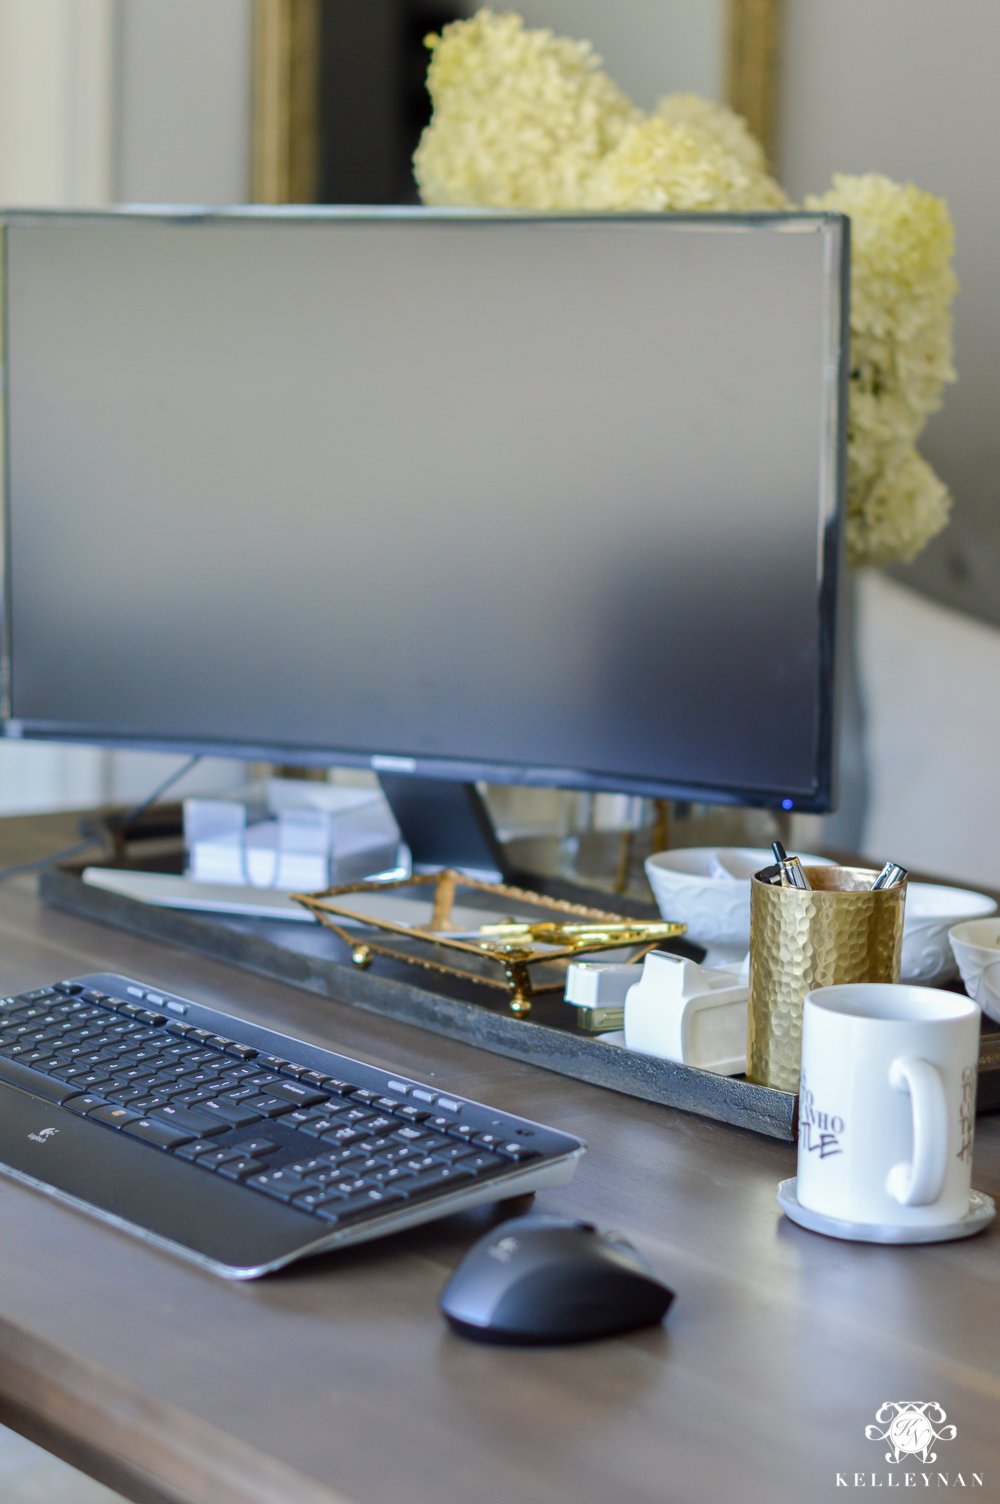
If you are set on having your computer monitor in the center of the desk, you can still make it work if 1. you are willing to drill a hole in the desk, 2. your desk is narrow enough to set it close to the edge and run the cable underneath (still visible from the door but can be obstructed with decor), or 3. your desk already has a pre-drilled hole. Instead, I opted to have it situated at an angle on the side of the desk closest to the outlet. Test your monitor position before you commit- this position is super comfortable for my personal preference. I wasn’t willing to cut through the table so while I knew a little bit of cord would have to run on the side of the desk, it would be minimal and I could disguise it.
3. DECORATE AROUND THE CORD
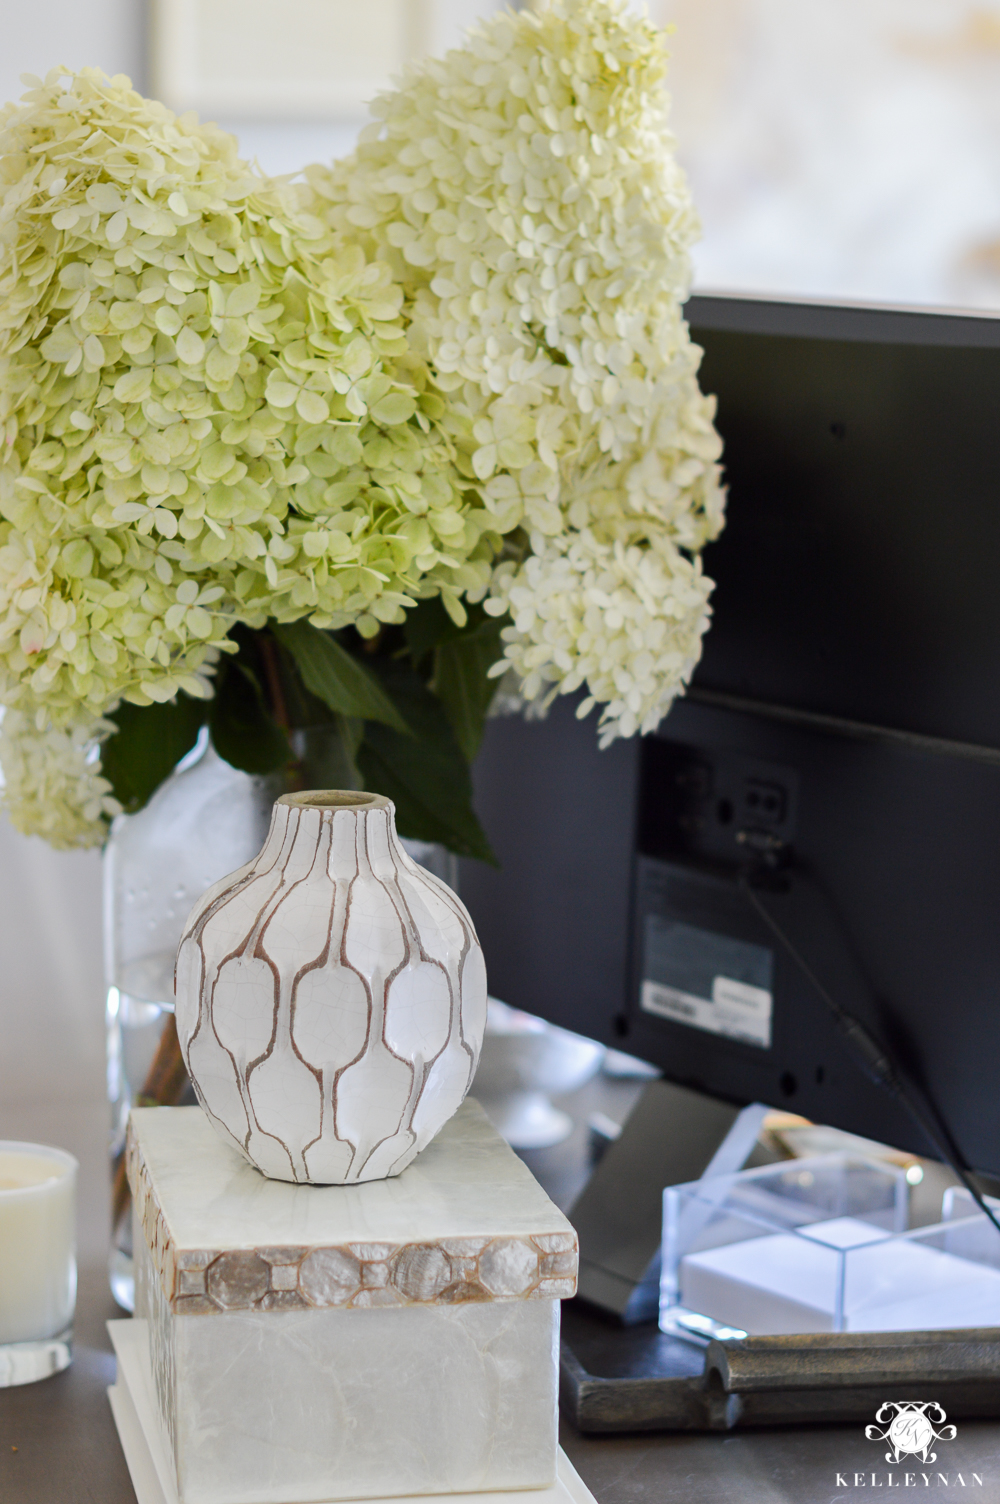
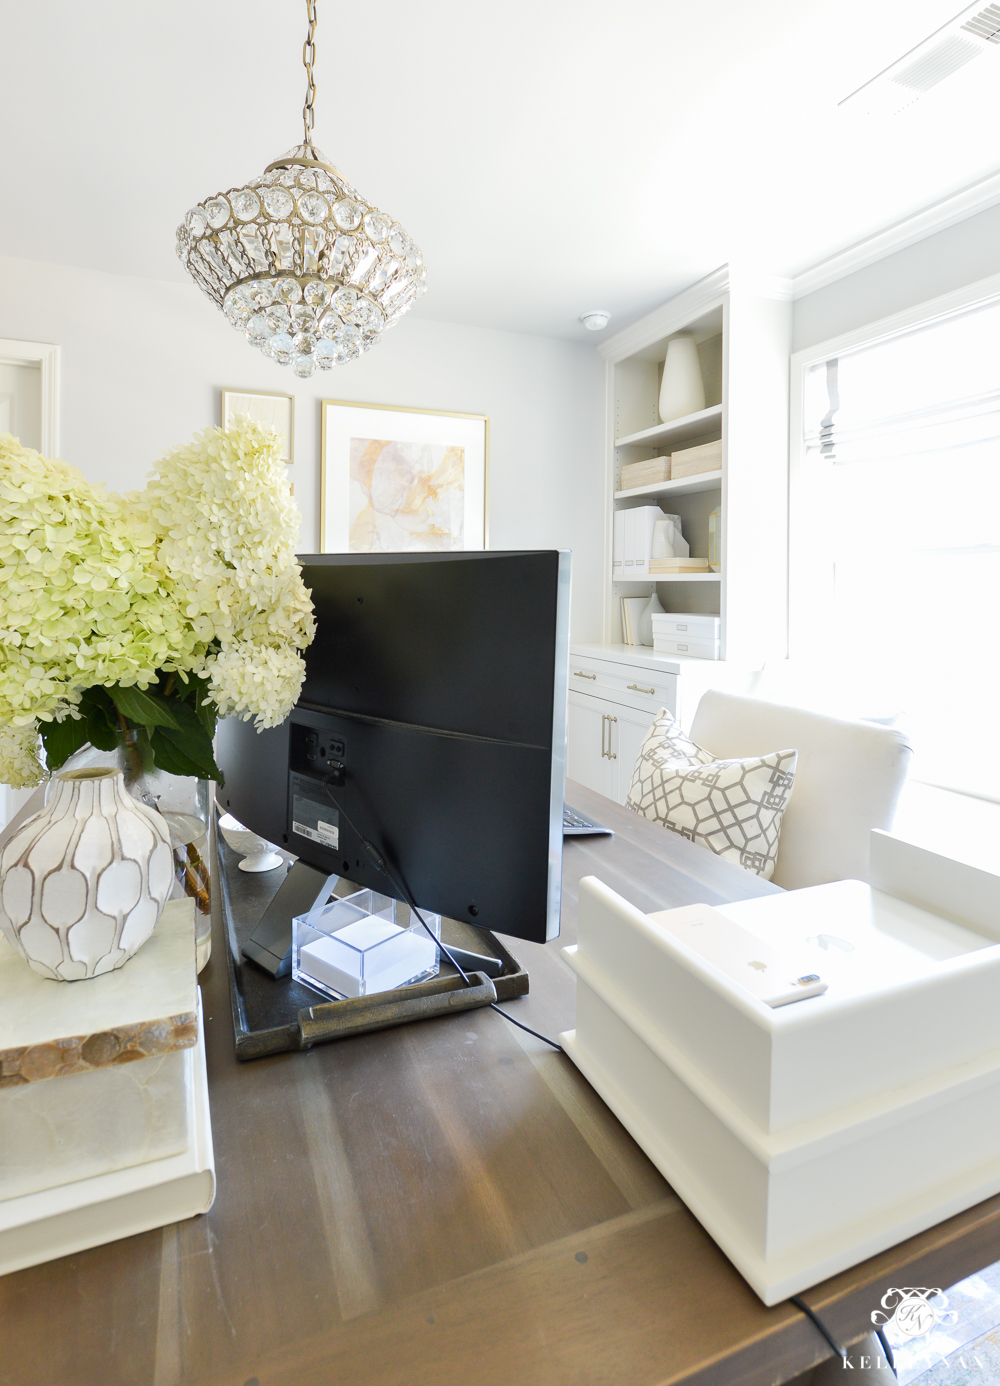
While you don’t want to go overboard and clutter up your desk, you can add a few essentials in a vignette to hide some of the cabling. Stand at the door/most frequently viewed spot and determine where to set up your little “moment”. Having something taller (like fresh hydrangea cuttings from the yard) will also help beautify the back of your monitor.
Even if you have no cords, unless your screen is super sleek, I wouldn’t want all this exposed, anyway 😉
4. DETERMINE THE CABLE PATH
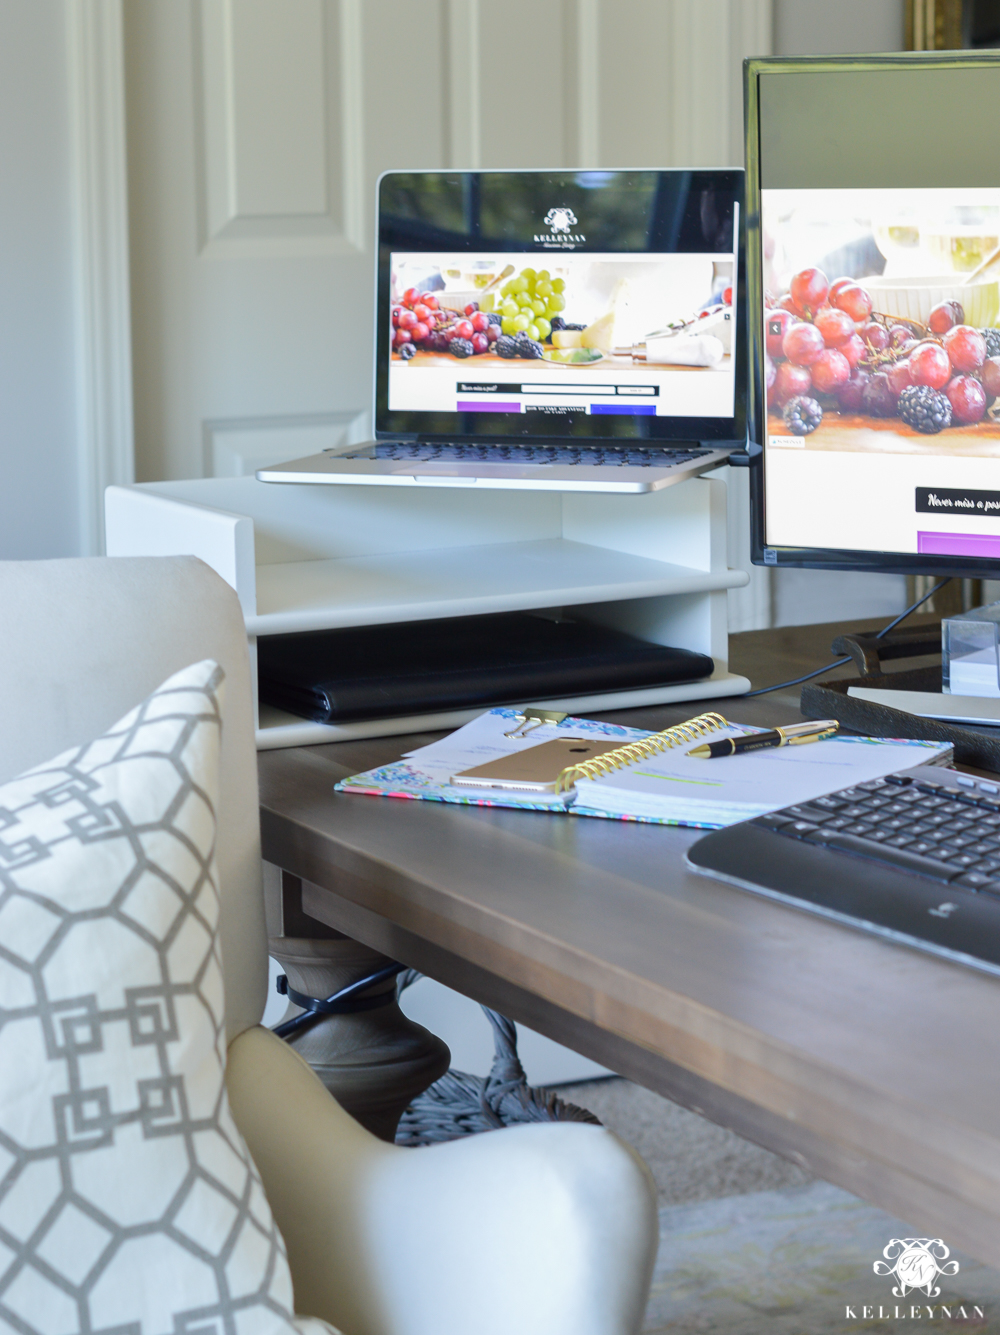
I mentioned that with my new setup, I have to use the large monitor in tandem with my MacBook. I wanted to have a “station” of sorts to keep the laptop accessible without cluttering the desk. I found a wooden document tray a long time ago at HomeGoods. It’s a double decker so I can slide my notebook and planner in the bottom shelf when I’m not using them, and keep the laptop on the top shelf. This piece isn’t necessary but works well with my setup. If you have a file box, letter sorter, etc. you can tuck the little bit of wire underneath, too. If you prefer that side to be open, a little cording will be exposed but it is minor.
5. GATHER AND MOUNT
I’ll admit, I got away with this part pretty easily because I only have one cord coming down from my desk. If you have an all-in-one or a sole monitor, your configuration can match but if you have multiple components on your desk, use zip ties (HERE) to group them into one single, large cable. The materials we used for securing the cording were:
- Zip Tie Mounts
- Zip Ties (both small and large)
- Velcro
- Surge Protectors (2)
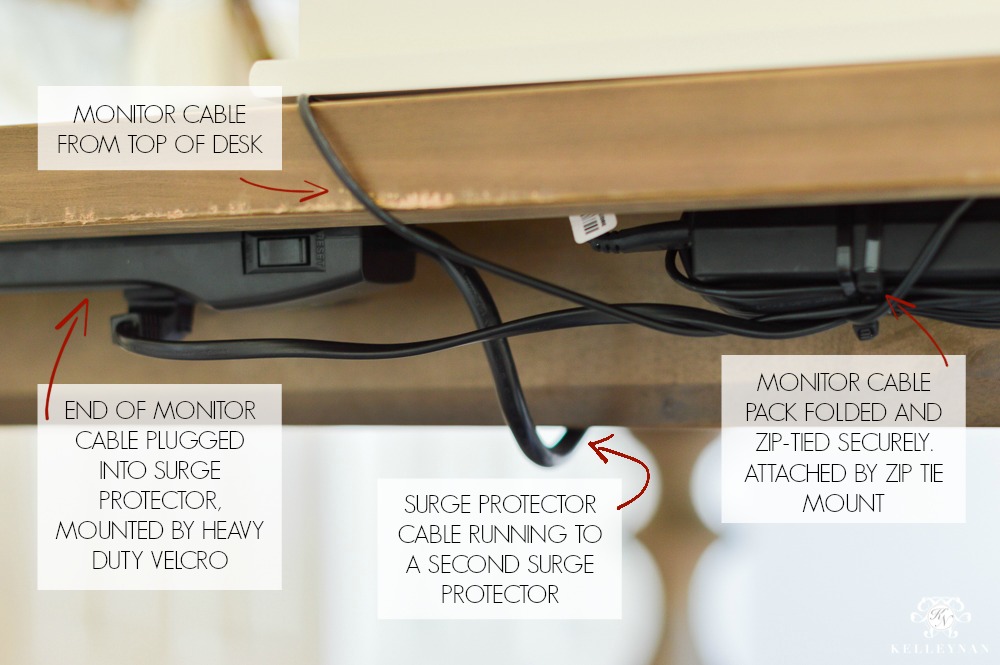
Here is what my cabling situation looks like. The desk/table has a lip/ledge underneath. These cables are attached on the outside of the lip. You cannot see any of what is going on under here unless you squat underneath the desk 😉 As a bonus, this makes it super easy to be able to charge your phone, tablet, etc. at your desk.
The extra cording is tied up on the other side of the lip, close to the back left desk leg.
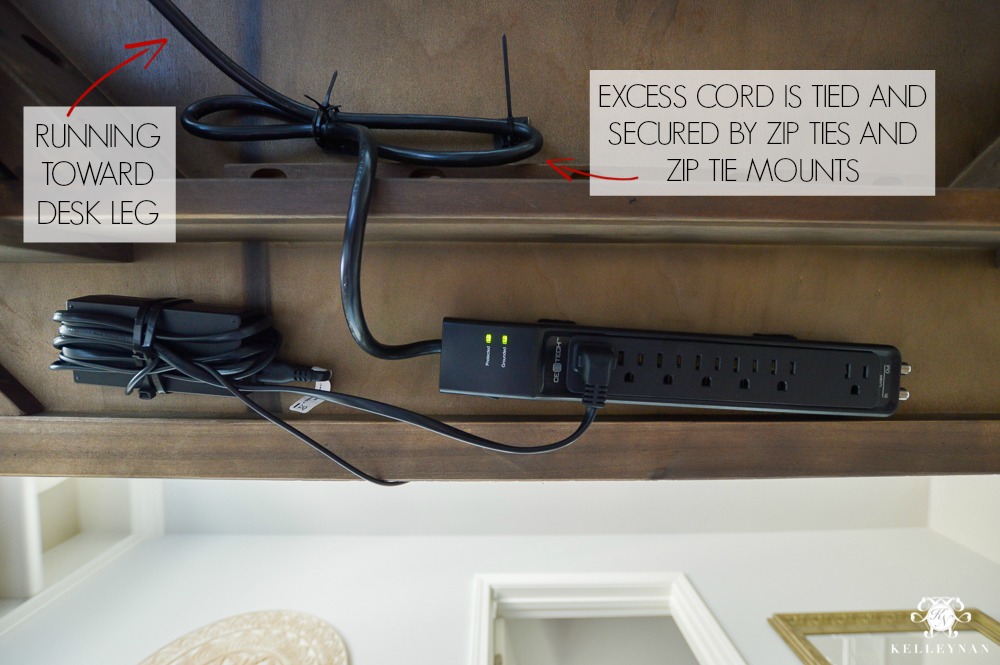
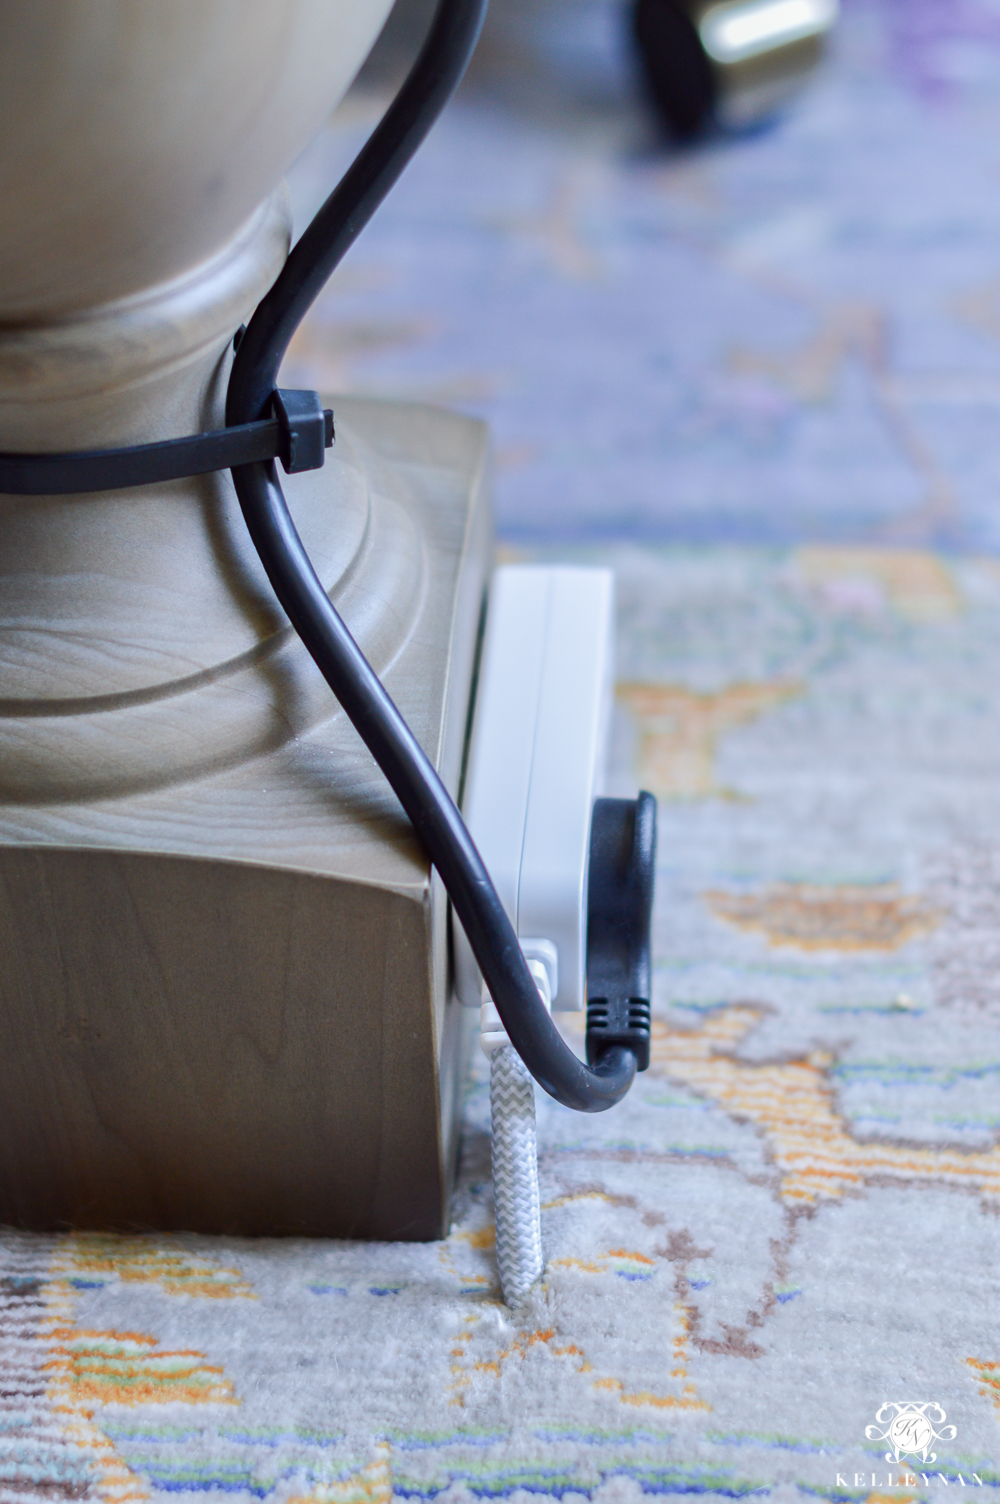
This is why. Once all the component cording is wrangled and fastened underneath the desk, only one cord will have to run down the back leg. Again, this is not visible unless you are sitting behind the desk. Dave used larger zip ties to secure the cord tightly. When the light isn’t glaring on the back of the leg, the black cording actually looks better than the white. Conversely, I opted for a gray for the cord running across the floor.
With the adhesive velcro, Dave secured a short surge protector to the bottom of the desk leg. If you don’t have as large of a base but have a leg without the curves that this one does, you can consider running a surge protector vertically up the leg, instead.
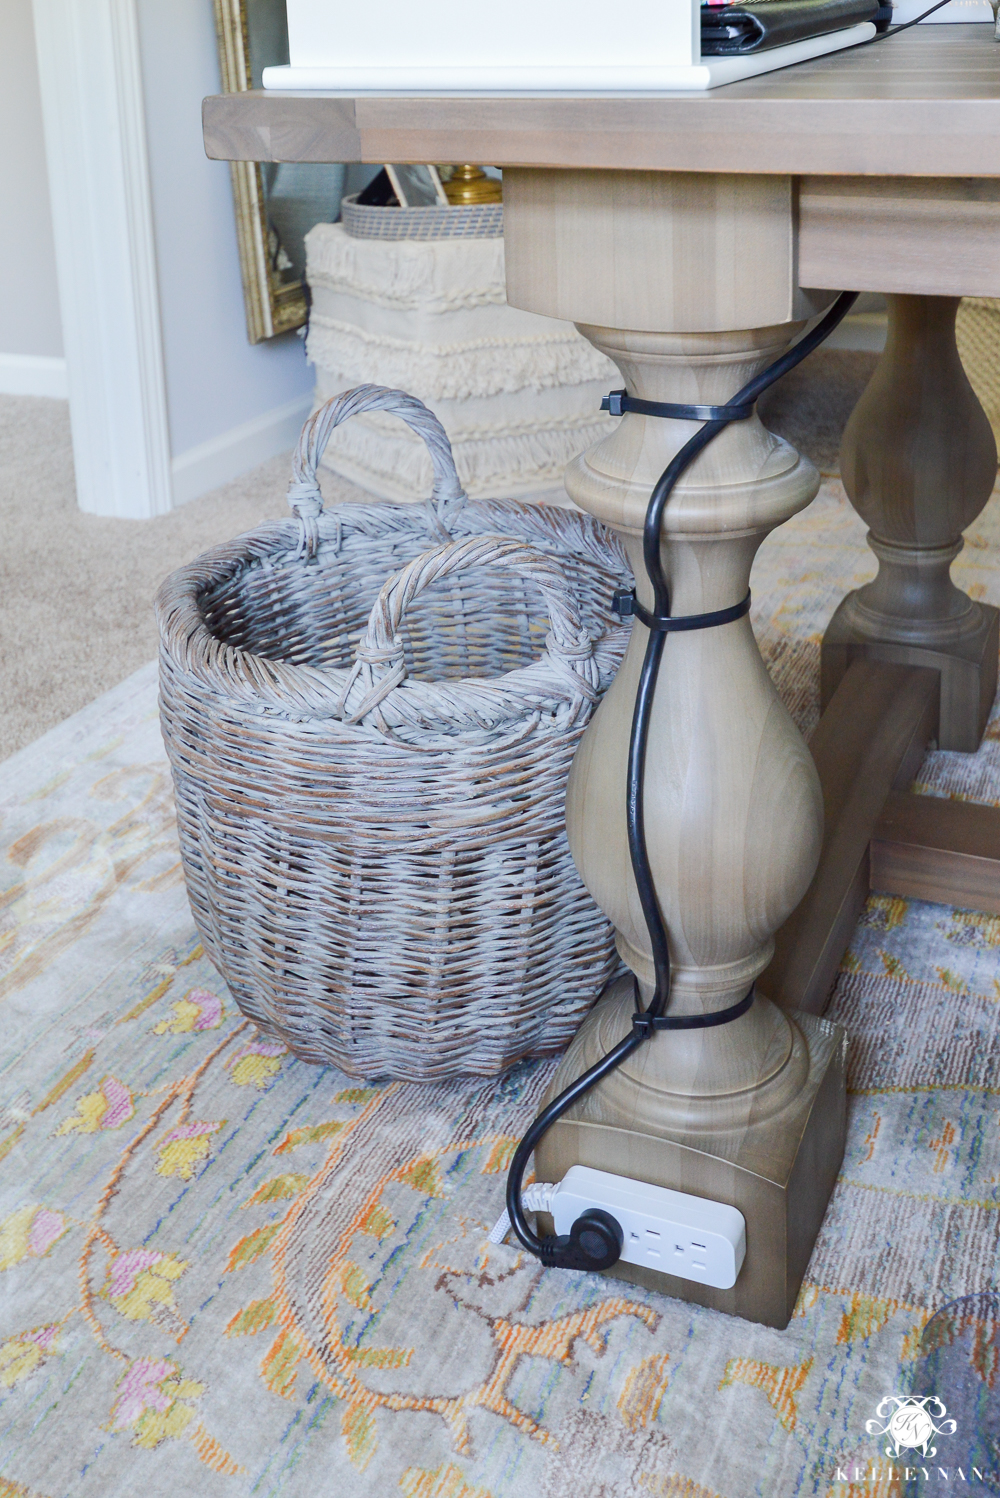
I know this may make some of you uncomfortable and by all means, you could use a cord cover or leave the cord open on the ground but I wanted to conceal as much as possible. I cut a tiny slit in the rug, just at the base of the leg and fed the cord through to the wall. This also helps cover excess cording. (NOTE: When selecting your surge protectors, be aware of the footage you are getting for both. Using the shortest cords possible will make for less excess you have to worry about.) If you go the route of cutting a slit, make sure your desk and rug are situated just as you want them in the room. The slit was cut just wide enough to let the end of the cord through; when you remove it and push the rug back down, you can’t even tell it has a slit.
This is it. The only cording visible and on the floor and because it is concealed by the desk, everything still looks totally neat.
Sources: Rattan Bins | File Holders | Magazine Holders | Cabinet Pull
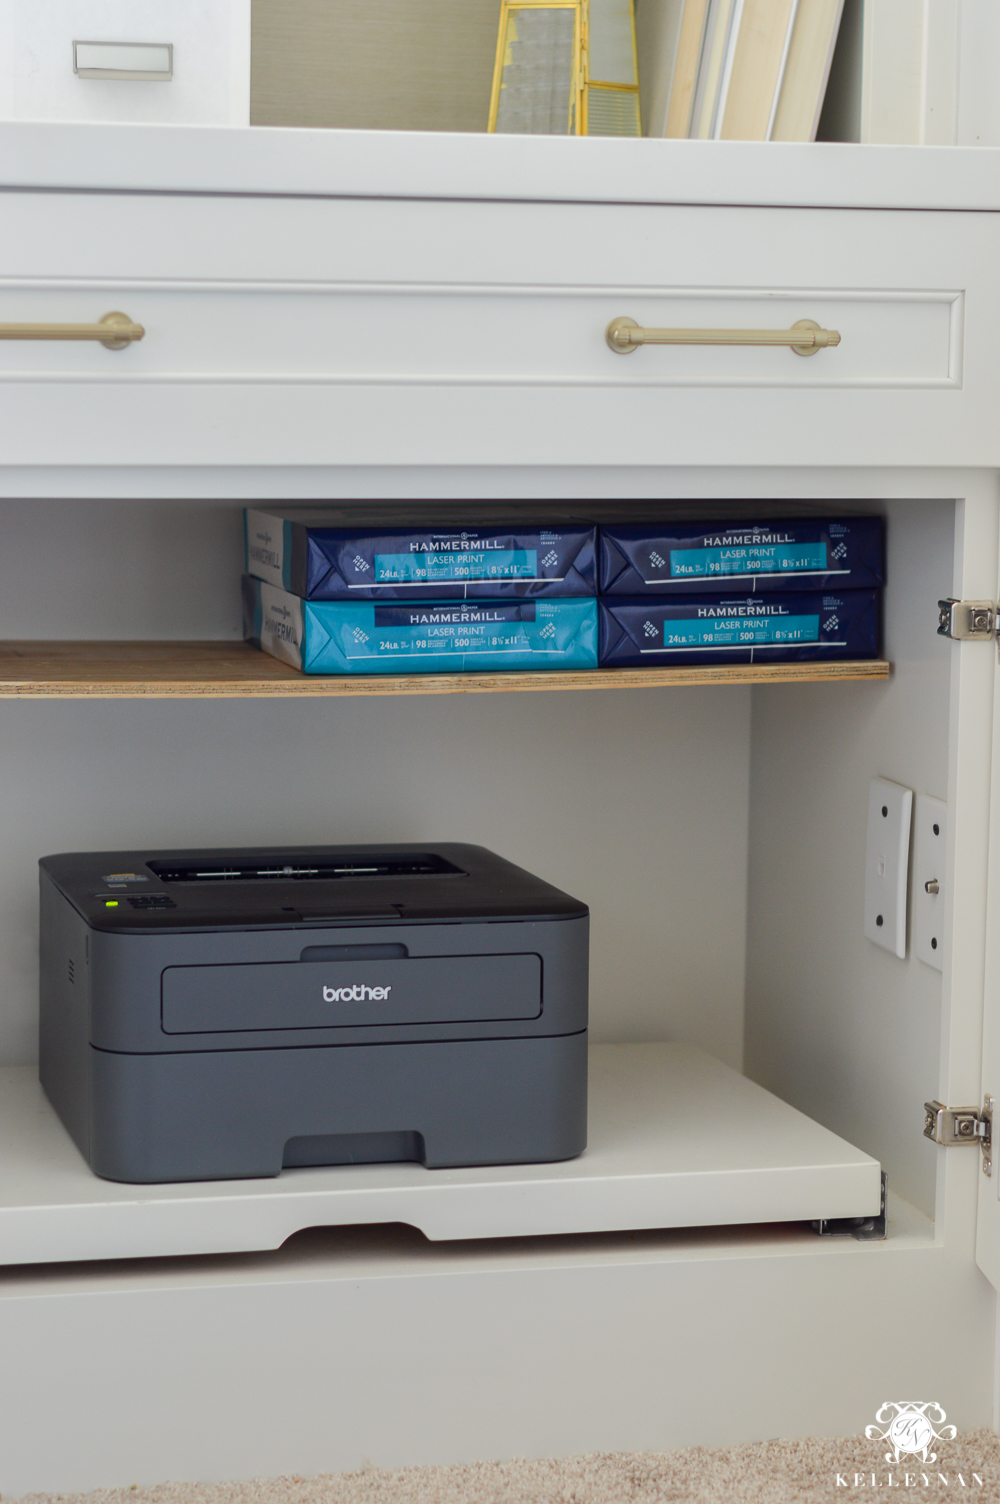
I’ve talked about my concealed printer drawer but haven’t actually shared the inside. The dimensions of this space were determined for a larger printer at the time, so my carpenter planned the entire depth of the cabinets based off of our former machine. Our new printer is compact and I love how easily the sliding shelf can roll in and out. A surge protector is connected to an outlet behind the shelving unit and sits behind the printer. The small, unpainted top shelf was an addition by Dave, created to make use of vertical space and store our router, modem, etc. Those were recently relocated to the great room so now, it can be used as paper storage. The other outlets just inside the unit to the right were formerly in use, also. Our carpenter had relocated those outlets for components which were housed inside the unit, and affixed a blank plate over the old live outlet, just outside the door.
Here is the view from the door, taken down low. Keeping my trash can on that side of the desk helps, too 😉
That’s it! It all comes down to minimizing the cords you have, consolidating what you have together, and securing them underneath your desk. If you have a handy carpenter in the house, you could come up with some cord shelves or something super sophisticated, but this is an easy method that we use and it looks good.
So, now that you have your cords under control, what about the actual desk styling? Here is my rule. Much like shelf styling, you don’t have to use every square inch of your desk. I keep the items that I like to be able to access quickly corralled on a tray. THIS TRAY is so large, I actually even added my monitor to it. Also, if I’m planning to have it out in the open, I may splurge a little more for the “pretty” vs. the basic. I still have plenty of basics, as shown in my office drawer organization post HERE.
So, I try not to set it out if it isn’t practical nor if it’s practical but not “pretty” 😉 Don’t go throwing away all the basic art/office supplies! Just make a home for them in a drawer instead of on display.
I also ditch the packaging and use trays and bowls. THESE sweet footed china dessert bowls I used are currently on sale. I keep about one third of the desk bare for projects and being able to spread out notebooks, magazines, my planner, etc. This practice, combined with having most everything situated on an oversized tray keeps my desk from looking cluttered. Plus, there’s still plenty of room for photos/art if I choose to use some down the road.
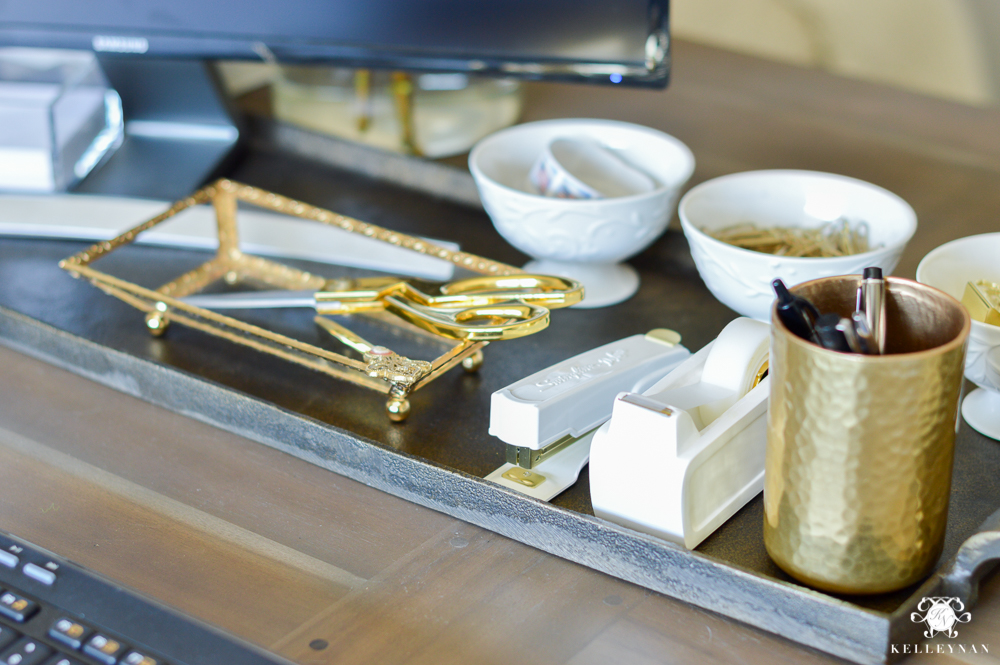
Sources: Tray | Scissors | Footed Bowls | Stapler | Tape Dispenser | Memo Block

Here is a peek of my desk when I am actually sitting down, working, I currently keep the adapter cable in a drawer when I’m not using it; Dave is going to drill a hole in the side so I can plug it in without having to set the laptop on top. After I finish with my laptop, I set it back in its rightful little spot on the top shelf.
For the full tour, you can visit the office makeover reveal HERE from this past fall. I am ecstatic to finally reclaim this space after stepping over boxes and mounds of paper for the last month. This coming weekend, I am setting out to take on my closet 😉 Let me know your thoughts. Would you now consider putting your desk in the center of your office?

Carpentry – Bobby Barton of Heartwood Renovations, and Darryl Ponquinette of Ponquinette Fine Woodworks | Paint: Sherwin Williams On the Rocks


I totally get it. While mine aren’t concealed completely, command strips and cable clips became my best friend when we decided to put our desk in the middle of our office. I don’t mind the little bit of white cord that shows because my desk is white, and most don’t notice the extension cord running behind it to an outlet. I could paint it the carpet color at some point to disguise it a bit more, but it really doesn’t bother me.
I am so super impressed! Looks gorgeous!
Susan
@tablefor5please
Susan, thank you so much!!
Lauren, painting the cable one day- I hadn’t even thought of that!
Great ideas for my office makeover. I hate cables and am always looking for creative ways to conceal them. Thanks, Kelley.
Bill, I’m so glad it was helpful!
Question, I am working on this same thing. Do you find you have an issue with the computer being across from the window?
Thanks for the post! ? Looking forward to putting my husband to work on my office. ?
Heidi, you’ll have to let me know how it turns out!
Hi! Where is your connection from your monitor to your MacBook? I’m trying to implement your tips and this is the one I’m missing.
Hi Katina, I keep my MacBook in an acrylic collator on the side of my desk and it connects to the monitor from there. Here’s a link to my collator, if that helps. It holds the MacBook and other items perfectly.
https://rstyle.me/+LoNdI5AfSHt9uKLN3g5uJw
Gosh…every bit is brilliant! I think we all need a Kelley Nan and Dave in our lives! BTW…the next time you come for a visit…
haha, put us to work! 😉
Hi can you tell me where you got this table for your desk and the name of it? I love it.
Thank you
Jess
Hi, Jess! It is actually a dining table from Restoration Hardware.
Looks beautiful! What a peaceful and calm place to work. I have one question, though. Sometimes one of my devices , especially my phone runs out of power while I am working at my computer and I find I need to plug into a quick charge charger half way across the room. Does that ever happen to you ? How do you handle charging your phone or iPad when you need to ? Thanks so much!
Hi, Marguerite! Absolutely. Luckily, with two surge protectors mounted to the desk, I have plenty of outlets to be able to set my phone on my desk while it charges. They also have surge protectors now with USB ports!
I loved your ingenuity in pulling off hiding those pesky wires! You did a beautiful job! I noticed your printer. Would you mind sharing the type, model, & source? Are you happy with its performance? I am in the market for a new one. Any information you can provide would help. Beautiful job as always!!!
Joni, thank you! It is this one: http://amzn.to/2vIvQtw. Black and white (only) laser printer. It is still new to us but so far, we love it. It’s fast and the internal tray holds paper so you don’t have one of those trays that stick out 😉
Great post and great ingenuity in hiding cords. I would have considered using the basket or a taller basket as a hiding place for the cord and surge protector rather than down the table leg. A hole could be cut in basket and a small slit could still be cut in the carpet at the edge of the basket to run the cord to the outlet.
Carole, good thought! Thank you for visiting!
LOVE this post!! Your home office is definitely #goals and I’ve always wondered about this! Thanks for all the detail your provided. Looking forward to making this my next weekend project! =)
Jessica, thank you! Did you do it?!
Wow!!! What clever ideas for hiding cords and cables. Thanks so much for sharing.
Mary, thank you so much!
Your office is stunning! I have always had my desk “floating” in the middle of the room, but not worried that much about cords and cables…now that’s all I see! I am running to hide my cords now that you’ve shown how to do that so cleverly 😉
Janet! Haha- it doesn’t bother some people- all about preference. It helps not only visually, but also keeps them out of the way by having them mounted. Let me know if you take the plunge!
Unless I missed it, what desk are you using? I love this look!
Hi, Richard! It is actually a dining table from Restoration Hardware 😉
Kelley Nan,
My new inspiration office!
I love the colors.
Where did you get that chair?! I like it’s elegance and can be accented with a pillow.
Thanks!
Hi! It is from Ballard Design- a bit of an investment (I scored mine at the outlet though) but seriously the BEST desk chair I’ve ever sat in.
Thanks, Kelley Nan!
Greatly appreciated!
Wil
Just ingeniously gorgeous! Also I love love love that you list all your sources. Thank you for that.
That rug is beautiful, is it as soft and as muted as it looks from your pics because the online store pics dont look so appealing.
Thanks again
Lorine, I am so glad you like it; thank you! Yes, the rug looks way more “blended in” once it is down on the floor 😉
This is brilliant! I love your rug trick. Your office is beautiful by the way!
Love love love! Unfortunately my office is not nearly this large. Still trying to figure out if I can get away with a smaller desk. The only item I cannot find from your list is the media shelf that appears to have plugs/sub for iPad, phone etc. Beautiful job!
Hi, Lindsay! Are you talking about the surge protector that is velcroed under the lip of the desk?
Such a beautiful office! Sorry if I missed it, but where did you find the white, stacked trays, that are perched on the side of your desk (your MacBook sits there). Keep up the great work!
Hi, Jamie! It is actually one piece- a two tiered document tray. I found it at HomeGoods so I don’t have an online source but you may want to check there!
Your home office looks amazing!! Is it OK for you to share the size of you room, size of your desk, and the size of your rug? Everything fits so perfectly together!
Wow, you created a perfect office with attention to details. I love the fact that you posted many pitcures to help us understand how far you went to make this office wirefree ! A big MERCI!
Sophie, thank you! Good luck!
This set up is awesome. Where did you get your 2-tray letter organizer on which your laptop sits? Thanks in advance!
Hi, Kevin- I found it at HomeGoods a couple years ago.
You inspired me to do this in our office. Thank you for your tips. I felt a huge sense of satisfaction when I was done. I don’t think I could have done it without your suggestions!
Celeste, that is the ultimate compliment; THANK YOU FOR SHARING! Enjoy your space! xo
Hi there – Did you have your curtains custom made? If so, can you share your source? Thanks!!
Hi, Jennifer! You can find them here: https://rstyle.me/n/b5jwg6b5rpf
Brilliant! Thanks for the inspiration! I am redoing my office and my leggy desk sits in the middle! I am going to do this to help hide my cords! Thanks again!
What a stunning office! I have a similar space with built-ins and will be using your pointers to float my desk in the center. Thank you for all the helpful tips and inspiration.
I LOVE the rug and was wondering if you would share the source?
Hi! Thank YOU! Here ya go 😉 https://rstyle.me/n/ctczzmb5rpf
Hi Kelley,
I loved this post and now have some great ideas for helping conceal cords in my office!! I did want to address one major concern, brought to my attention when I was discussing my cord-hiding plan with my father-in-law, who is a master carpenter. Running electrical cords under a rug or carpet is a REALLY big safety concern. Extension cords are intended to be surrounded by air to help with cooling. Placing them under a carpet does not allow this. Additionally, any damage that may get caused over time (repeated stepping on, getting vacuumed etc.) will go undetected which could lead to a fire. My father-in-law suggested to use a cord protector to run the cords through under the rug to give the cord some ‘breathing room’ and protect it from damage. I would hate for anyone to have their house burn down because of unsafe cord hiding!!!
Here is the cord protector I bought to run under my rug:
https://www.homedepot.com/p/UT-Wire-5-ft-Cord-Protector-with-3-Channels-Black-UTW-CP501-BK/203377573?cm_mmc=Shopping%7CG%7CBase%7CD27E%7C27-3_EXT_CORD-WORKLIGHT-SURGE%7CNA%7CPLA%7c71700000034239050%7c58700003946878360%7c92700031956748099&gclid=EAIaIQobChMIg83Z4OKV4AIV0YKzCh0SGAzzEAQYBCABEgKX7_D_BwE&gclsrc=aw.ds
Elizabeth, thank you for sharing!
This room is such a beautiful inspiration! Thank you for sharing it! Mind sharing the dimensions of your room and the depth of the built in?
Around 13′ wide and the bottom cabinet depth is 21-22″ 😉
Absolutely love this. Have been looking for a while how to pull my desk from the wall and better fill space but worried about puppy vs cords. Was ready to immediately overhaul with all your tips but then realized it’d be hasty.
Problem is, this doesn’t seem like it’d work and still be attractive with two 27″ monitors for those of us who work from home in certain fields, such as architecture or accounting. Or even the gamers among us who don’t want to advertise that we game and want an attractive space.
Any tips for working with two monitors and still pulling off gorgeousness you were able to?
Quinn, I’ve never tried with two monitors but I would maybe still use a large item(s) to block the back of the monitors and then use ties/one of those cord tubes to have both cords run through like a single tube. Hoping some of what is shown can give you some ideas to make it your own! xo Good luck
I’ve just come across this on Pinterest and I’m SO glad I did!! I work full-time from home and right now I have a desk in the corner of my bedroom, but soon, I’m moving to a place where I’ll have my own office.
I’m planning on having my desk in the middle of the room but I have a monitor and a tower PC, so I wasn’t sure if it’d be possible to hide the cables. (Luckily I have a wireless keyboard and mouse so that helps.) I’ll definitely be using some of these tips and I can’t wait to give it a go when I move in! Thanks so much!
Charlotte, thank you for taking the time to comment! Best of luck to you!!
Hi there – what is the name of your wall color? Buying your desk 🙂
Thanks,
Traci
On the Rocks 😉
Im sorry of if I missed it, but where is your computer tower?
There is no tower 😉
I’m sorry if I’ve overlooked it. Where is the computer tower? That’s the eye sore I have!
Hi Tara, Thank you so much for stopping by. I actually use my laptop and do not have a tower. I keep my laptop in a lucite organizer on top of my desk.
What are the dimensions of your table/desk?
Hi! It is 75″x43″
Thank you, thank you, thank you for this article! I am actually going to be using a dining table as a desk solution in our cottage that doubles as both an office and a dining room. This has been done in a make-shift way before, but I want it to be pretty and functional, hiding power strips, etc. and really keeping the space clear so it can quickly convert. I have my printer and office supplies neatly hidden in a beautiful old library cabinet that also doubles as a “sideboard”. I just love the way of utilizing a table as a desk helps the stare-at a-wall-problem and is just such a nicer, larger workspace. Thank you for the suggestions on tables as well, I think I found my perfect one.
Mimi,
I am so happy that I could help! I also love your solution for the library cabinet. I would love to see your finished office project. xoxo
So glad I found this. I use a table vs a desk as well because I need to use two monitors, so depth is super important. I decided to redo my office now that I’m pretty much working on it full time due to the pandemic. I wanted the desk facing the middle of the room and not up against the wall and could not figure out how without tripping over cords. When you look for office layout ideas online, it is just like you said, a laptop and nothing else. Or not even that, just a pad of paper haha. I suppose that would fine if all I used it for was to contemplate my grocery list. The rug trick is the magic piece of the puzzle. Thank you for sharing!!
Jennifer, Thanks so much for checking in! I have really enjoyed the layout. I hope you do too! xoxo
Ohhhh my gosh! Bless you! 😘 this is the best thing I’ve ever read/seen. I work from home so I know all about the laptop/ monitor situation and this blog post is everything! Can’t wait to redo my office to mirror yours 😍😍
I am so glad it is helpful! I’ve added a few new components so I need to do a cleanup! Best of luck to you!
Like many of us currently working from home, I was searching for a way to improve my dedicated home office space and had the good fortune of stumbling upon your post. Your office is cleverly designed and beautifully executed in every way. Thanks so much for the design resources too, which I’m thrilled to discover are still active several years on. I’m now super inspired to try several of your tricks in my home. Thank you!
Jackie, Thank you so much for stopping by to visit! When we bought our home, the office was totally different. Today’s version still works so much better for me. I appreciate your kind words very much!
WOW! Thanks for an extremely useful article. I am in the middle of redoing my office and decided just recently to get rid of my old bulky desk and use a table instead. I am in the process and know my cords and two monitors will be a challenge. Your solutions and suggestions hit the spot! I am excited to look through your other posts. Your office is inspirational!–Wendy
Wendy, Thank you so much for your kind words and for stopping by! I think you will love using a table as a desk. I can tell you, I will never go back! The cord solution has worked so well for me. Hope it works for you too!
Thank you very much for writing on hide computer cords when your desk is in the center of the room, it’s difficult for me to get such kind of information most of the time always. I really hope I can work on your tips and it works for me too, I am happy to come across your article.
Thank you so much for taking the time to stop by! I can tell you that this solution has worked very well for us. We sure like practical, but really love the aesthetic of no visible cords.
Trying to grasp this mentally. Is that a 27 inch monitor, or…?
Hi Elan, Thank you for visiting. Yes, this is a 27″ monitor.
I love your office makeover! So do you have an all in one monitor? If not ,where do you hide the base?
Thanks!
Jamie, Thank you so much! I actually use my laptop as my “base.” I am so happy to report that I have also recently graduated to two monitors. They take up a lot of desk space, but help tremendously. xoxo
Thank you for sharing your great ideas! What about the cable that connects the MacBook to the monitor?
Thank you for taking the time to stop by! I use an HDMI cable to connect my MacBook to the monitor.
Thank you!! This is super helpful!!! Looking to get a 60″x30″ table very, very similar to yours and it will float in the center of the room and was second guessing everything whether I needed a desk with the built in plug, etc. Now I’m confidant with this I can hide it pretty easily. And my plugs really should just be laptop, maybe lamp, etc. Love the decorating ideas, too!!
Hi Julie, I am so happy to help! I hope you have fun designing your new space.
Hi Kelley,
Who did your built-ins? I’d love to do the same with my office space!!
Vivian
Hi Vivian, Thank you so much for stopping by! I have the sources listed in my office makeover post. I was so pleased with the contractor’s work. Here’s a link that provides the details.
https://kelleynan.com/one-room-challenge-week-2-the-office-built-ins-are-installed/
Looks great but isn’t daisy chaining power strips dangerous?
Tex, Thank you so much for taking the time to stop by. As mentioned in my post, there are caveats and this solution may not be for everyone, but it works for us.
Any ideas on how to hide cords from a keyboard and mouse, other than to go wireless?
Hi Morgan, Thank you so much for stopping by. I am sorry, but I do not. I use a cordless keyboard and mouse. It sure frees up the space and looks so much better.
This a fantastic setup. Great job and Thanks for sharing! Question: how do you connect your laptop to the monitor? I did not see a cable for that. Thanks!
Hi Marcio, Thank you so much for taking the time to stop by. There is an HDMI cable that connects my laptop to the monitor. Hope this helps!
As many have said this is very helpful! Do you have any current table links that are similar to your? Having a heck of time finding something comparable. Thanks!
Hi Rae, Thank you so much for taking the time to stop by. I need to do an update on current table/solutions and will work to complete that soon. Thank you for bringing this to my attention.
This is a great article! I’m about to finally do a home office and will definitely use some of your tricks. Just curious, what size rug do you have under the desk?
Hi Valerie, Thank you for stopping by. I am so glad to know that you found some usable tips. The office rug is approximately 6′ x9′.
It is one of the best write up on hide computer cords when your desk is in the center of the room. Before hitting on the other blogs I would request all to give a try over here to get the best available content. I must say this is one of the best among them. You have done a great research for I feel, thanks for sharing.
Thank you so much for taking the time to stop by, I appreciate the feedback and your kind note!
Genius! I workwith people all the time on this. This is the best I have seen. Kuddos to you!
Lisa, Thank you so much for taking the time to visit and for your kind note. I am so glad this was helpful to you!
How can I accomplish something similar with a glass desk in the middle of the room? There are 3 monitors as well against the front the desk! Please help!
Hi Sara,
Thank you for taking the time to stop by.
This method does rely on the desk surface being able to hide some of the components. I would look into seeing what you might be able to do with being able to do with strategically placed boxes or baskets that could serve as a hiding place.
I wish you the best of luck in finding a solution that works for you!
I’m curious what direction your room sets. I’m really loving ‘On the Rocks’ by Sherwin Williams but not sure if it will work in my east-facing room.
Any feedback is appreciated.
Tammie
Hi Tammie, Thank you for taking the time to stop by. My office has windows that face south. I do recommend trying some samples first in different areas, before you fully commit to a paint color if you’re not sure.
Hi! Where did you get the white two tier shelf for your desk?
Hi Candice, Thank you for taking the time to stop by! I purchased the two tier shelf years ago at Home Goods.
Can you give me the desk/dining table dimensions? I love it!!!
Thank you! The dimensions are 75″ x 43″.
Thank you! Looking at the RH website, is it this one? The dimensions show slightly different so just wanted to check because maybe it’s a different model! Dimensions show:
76″ Table: 76″L x 38″W x 30″H
https://rh.com/catalog/product/product.jsp?productId=prod6470321
It certainly looks similar, but I bought mine years ago, so I don’t know if this one is a different model. Here’s a link to another office post that shows additional pics. Hope this helps!
https://kelleynan.com/one-room-challenge-home-office-makeover-reveal/
Hi Kelley,
It’s me again. I’m redoing my little office a mini version of yours as my space is limited to a small room. I’m almost ready to hide my cords, but waiting on the metal tray first. I’m wanting to put something behind my computer screen but has to be small. Will you share where you found that pretty white seashell box and that adorable vase?
Thanks Charlotte
Hi Charlotte, I’ve had those two items for years and don’t recall where I got them. I wish you the best of luck in completing your office project!
This was so extremely helpful! Thank you so much !
Jessica, Thank you for stopping by and for your kind note. I am happy to know this post was helpful to you!
Where is your desk from? It looks like a trestle dining table. Just what I’m looking for.
Hi Shelley, Thank you for taking the time to stop by. The table is no longer available, but here’s a link to one that’s similar.
https://rstyle.me/+P_nxBBU53IlZ7CZ-CBmcCA
I have been searching for a post like this! THANK YOU!!!!!!!
Hi Morgan, I’m so happy to know that this post was helpful to you. Thank you for taking the time to leave a note!
Hi – love these ideas. Can you please share the size of the desk. Thank you!
I’m so happy this post was helpful to you, Krystle! The size of the table I use as a desk is 76″ x 43″. I hope this helps!
This is SO USEFUL! I’ve put off reorienting my office for years because of the extra monitor and cords, and this walkthrough answered so many questions for me!
Hi Emily, It makes me so happy to know that the information in this post is useful to you! Thank you for taking the time to visit and I really appreciate your kind note.
This is the most helpful article on cord management. Thank you!
Jill, Thank you so much for taking the time to visit. This method has worked well for me.
I came across this post as I was figuring out how to run power to my lift coffee table. Just wanted to say thank you so much for putting this out there as it inspired my setup which worked so perfectly!!
Hi Cindy, I am so happy to know that this post was helpful to you. Thank you for taking the time to leave a note.